The hot glue gun must not be used in a humid environment or in the open when it is raining. Do not expose
the hot glue gun to spray water jets. Disconnect the hot glue gun from the power supply when not in use and
during work breaks of more than 30 minutes.
NEVER remove a glue stick that is already inserted into the hot glue gun. This may result in irreparable
damage to the gun.
RECOMMENDATIONS FOR REPAIR: If the power cord is damaged it must only be replaced by a qualified
person to exclude any hazards. If damage occurs to individual components of the QUIXX Dent Repair Kit,
in particular but not limited to the hot glue gun, these components must be disposed of properly and no
further use made of them.
A) HAZARD WARNING:
IMPORTANT: Please read all instructions carefully before starting repairs and make sure that you have
understood everything. Improper use could result in electric shock, fire or injury. PLEASE KEEP THESE
INSTRUCTIONS FOR FUTURE REFERENCE!
ATTENTION! The hot glue gun must be placed on the integrated stand when not in use. The stand is also
intended for cooling after use. Remember that any remaining glue residue from the nozzle may drip onto
the underlying material.
NEVER unplug the hot glue gun by pulling on the cable. Disconnect the device from the power supply by
pulling the plug.
Instructions for use:
HOT SURFACES. RISK OF BURNS! The hot glue gun nozzle (a) and the glue (c) may reach temperatures
of between 150 and 200°C. Avoid any contact with the skin.
Children must not play with the device. Cleaning and maintenance must not be carried out by children
unless supervised by an adult. Store the glue gun out of reach of children. The hot glue gun may be used by
children 8 years of age and older and by persons with reduced physical, sensory or mental abilities or lack
of experience or knowledge if they are supervised by a person responsible for their safety who has been
instructed in the safe use of the device and who has understood the associated hazards.
NEVER place objects other than the recommended glue sticks in the hot glue gun. Do not fill with liquid or
pasty glues.
Before use see the QUIXX Dent Repair Kit video at www.quixx.com
When inserting a new glue stick wait a short time to allow the new glue stick to heat up.
In case of burns, wash the wound immediately under cold water. Do not first try to remove the glue from the
skin. Consult a doctor if necessary. Children may only use the hot glue gun in the presence of an adult.
If the rate of feed of the glue stick is excessive it may stick in the gun and block the feeding mechanism.
Do not forcefully push the glue stick into the gun, but allow the gun to reheat.
For household and similar use only.
CLEANING: Disconnect the hot glue gun from the power supply before cleaning. Wipe the hot glue gun
housing with a slightly damp cloth and dry it afterwards. Never use solvents or strong cleaners.
MAINTENANCE: Disconnect the hot glue gun from the power supply before maintenance. Do not open the
device yourself – risk of injury! Do not oil or grease any parts. The device must NOT be damaged. Repair or
replace the device before use
MODIFICATION of the product: Modification of the components included in the QUIXX Dent Repair Kit is
NOT permitted.
B) INSTRUCTIONS for using the hot glue gun
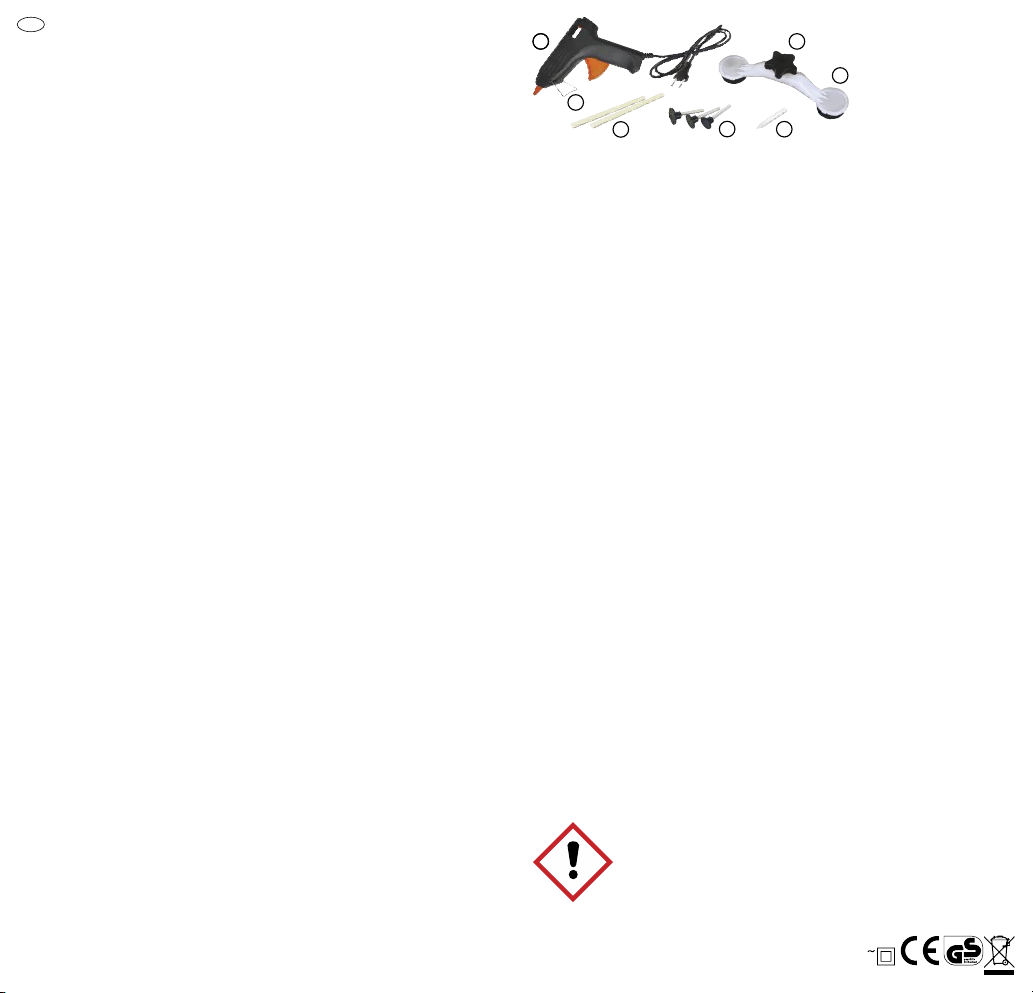
1) Fit the stand (metal bracket (b)) in the holes provided in the front left and right of the housing of the hot
glue gun (a) in order to ensure that the hot glue gun (a) is securely positioned. 2) Insert a glue stick (c)
through the feeder on the back of the hot glue gun. 3) Then press the trigger 2-3 times until the glue stick is
firmly seated in the hot glue gun. 4) Let the hot glue gun preheat for about 5 minutes. The hot glue gun is
ready for use when adhesive is ejected from the front of the nozzle when the trigger is pressed. During
preheating make sure that the hot glue gun is in a stable position.
Not suitable:
- Dents smaller than the pull button (2. 5 cm)
- Dents with a tip or edge
- Dents over 8 cm in diameter
- Do not use on repainted vehicles, as there is a higher risk of lacquer chipping!
- The substrate must be resistant to solvents
This device is marked in accordance with the requirements of the European Directive 2002/96/EC on Waste
Electrical and Electronic Equipment (WEEE). Products subject to this directive are marked with a symbol
of a crossed-out waste bin which indicates that disposal in normal household waste is forbidden. Dispose of
this product at a recycling facility with a separate collection for electrical and electronic equipment.
QUIXX DENT REPAIR KIT
EN
Electrical and electronic equipment must not be disposed of in household waste. The consumer is legally
obliged to return electrical and electronic equipment at the end of its service life to the public collection
points set up for this purpose or to the point of sale. Details are regulated by the respective national law. The
symbol on the product and/or on the packaging refers to these regulations.
F) DISPOSAL:
C) INSTRUCTIONS for repairing dents with the QUIXX Dent Repair Set
Dimensions: 170x141x30 mm Rated voltage: 230 V 50/60 Hz
Power: Rest phase: 12 W Heating phase: 40 W Melting temperature: 170°C
Heating time: 8-10 minutes Glue cartridge diameter: 11mm Protection class: II
5) After completing the repair unplug the hot glue gun from the power outlet, place the it on the wire stand
and let it cool – DO NOT attempt to remove any unused glue stick from the hot glue gun and do not put the
hot glue gun away until it has cooled down fully.
1) Clean the surface of the damaged area with a clean, damp cloth. 2) Prepare the hot glue gun (a) as
described in B) Instructions for using the hot glue gun. 3) Select a tension plate (d) suitable for the size
of the dent. (Note: The larger the tension plate, the greater the tensile force). The tension plate must be
smaller than the dent. 4) Apply the hot glue (C) from the hot glue gun to the selected draw plate. Make sure
that all off the 4 holes in the tension plate are filled with glue (see Image 1). 5) Immediately place the tension
plate in the middle of the dent and hold it in position until it bonds (Image 2). 6) Allow the glue to cure for
approximately 1 minute. We recommend that you do not allow the glue to cure for longer than 2 minutes.
7) Centre the hole in the repair bracket (g) over the screw thread in the bonded tension plate. Screw the
rotating knob (e) onto the screw thread of the tension plate. Turn the rotating knob slowly clockwise until the
desired deformation is achieved or until the tension plate detaches from the sub-surface (Image 3).
8) If necessary, repeat the procedure to further improve the result. 9) If adhesive residues remain on the
varnish or draw plate, you can dissolve them with isopropyl alcohol, silicone oil, nail polish remover or a
similar solvent. Alternatively, you can easily heat the area with a hair dryer to loosen the glue.
D) IMPORTANT INFORMATION:
E) TECHNICAL DATA:
The ideal temperature range for eliminating dents is an outside temperature of 18 - 30 degrees Celsius.
At lower temperatures, carry out the repair in a garage or preheat the vicinity of the dent using a hairdryer.
If the dent does not disappear completely, repeat the procedure until the desired result has been achieved.
(Note: Some dents may not be 100% repairable). If the paint has cracked or flaked, applying the glue and
pulling out the dent may cause the paint to peel off. Apply a few drops to a cloth and wipe the affected area
for a few seconds using gentle circular movements. Before doing so test the compatibility of the paint and
the isopropyl alcohol on an inconspicuous location.
Disposal instructions (2012/19/EU, 2006/66/EC)
G) CE CONFORMITY:
Declaration of conformity: E.V.I. GmbH hereby declares that the product (Art.Nr., XY-15305) complies with
the Directive (LVD 2014/35/EU, EMC 2014/30/EU, RoHS 2011/65/EU). The complete EU Declaration of
Conformity is available for download at www.quixx.com.
WARNING! May cause an allergic skin reaction.
If medical advice is needed, have product container or label at hand.
Keep out of reach of children.
Wear protective gloves.
IF ON SKIN: Wash with plenty of water.
If skin irritation or rash occurs: Get medical advice / attention.
Dispose of contents, container to a hazardous or special waste collection point.
Version 1.2, Status: 7 / 2020
a
b
c
d
e
f
g
a
e.) 1 Rotating knob
g.) 1 Repair bracket
f.) 1 Plastic rod
to remove glue residue
d.) 3 Tension plates
in different sizes
b.) 1 Metal bar (stand)
for the hot glue gun
a.) 1 Hot glue gun
c.) 2 Special glue sticks
COLOPHONIUM
UFI: 1000-50SD-P003-UKK9
SPECIAL GLUE STICKS:
XY-15305, 12/40 W
Input 230 V
50/60 Hz
4) Text geändert


Csatlakozzon a termékről folytatott párbeszédhez
Itt megoszthatja véleményét a Quixx XY-15305 Ragasztópisztoly-ról. Ha kérdése van, először figyelmesen olvassa el a kézikönyvet. Kézikönyv igénylése kapcsolatfelvételi űrlapunk segítségével történhet.