
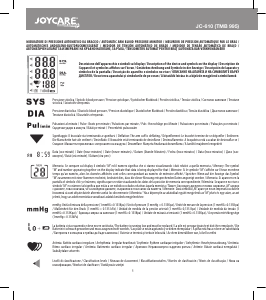
a
Quick start guide
Blood Pressure Monitor
HCBL400WT
For more information see the extended manual online: ned.is/hcbl400wt
Intended use
This product is intended to measure the diastolic and systolic blood pressure and pulse rate
of an adult.
The product is not intended for use on neonates, children or pregnant women.
This product is not intended for medical use.
The product is intended for indoor use only.
Any modication of the product may have consequences for safety, warranty and proper
functioning.
Specications
Product Blood Pressure Monitor
Article number HCBL400WT
Dimensions (l x w x h) 136 x 120 x 61 mm
Weight (excl. batteries and cu) 225g
Cu circumference 22 - 42 cm
Measuring method Oscillometric method, automatic ination and measurement
Measurement range
Cu pressure 0 - 300 mmHg
Systolic 60 - 260 mmHg
Diastolic 40 - 199 mmHg
Pulse rate 40 - 180 beats/minute
Accuracy
Pressure ± 3 mmHg
Pulse rate Less than 60: ±3bpm
More than 60 (incl.) : ±5%
Precision 1 mmHg
Memory 2 x 60 measurements
Battery type 4 x 1.5 V AA batteries (not included)
Battery life Approximately 270 times
Operating temperature 10 - 40 °C
Storage temperature -20 - 50 °C
Relative humidity ≤85 %
Environmental pressure 80 - 105 kPa
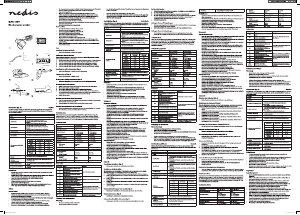
Main parts (image A)
1 Storage bag
2 Cu
3 Rubber air tube
4 Air tube connector
5 Battery compartment
6 Memory button
7 Start button
8 Irregular heartbeat indicator
9 Low battery indicator
q Pressure in the cu is instable or there is a lot of
remnant air in the cu
w Blood pressure level classication indicator
e Time and date display
r Systolic blood pressure
t Diastolic blood pressure
y Pulse rate
Safety instructions
-
WARNING
• Ensure you have fully read and understood the instructions in this document before you
install or use the product. Keep the packaging and this document for future reference.
• Only use the product as described in this document.
• Do not use the product if a part is damaged or defective. Replace a damaged or defective
product immediately.
• Do not drop the product and avoid bumping.
• Do not expose the product to water or moisture.
• Only use the provided power cable.
• Disconnect the product from the power source and other equipment if problems occur.
• Do not unplug the product by pulling on the cable. Always grasp the plug and pull.
• This product may only be serviced by a qualied technician for maintenance to reduce the
risk of electric shock.
• Consult with a doctor before use if you have any medical concerns.
• Do not use this product in a moving vehicle. This may result in inaccurate measurements.
Inserting the batteries (image B)
1. Open the battery compartment A
5
.
2. Place the batteries.
3. Close A
5
.
Setting the time and date
1. Press and hold the start button A
7
and the memory button A
6
simultaneously for two
seconds.
The time format starts to blink. The product is now in time format adjustment mode.
4
If no button is pressed for 60 seconds, the product exits time and date adjustment mode.
2. Press A
6
to change the time format.
3. Press A
7
to conrm.
The product is now in year adjustment mode.
4. Press A
6
to adjust the number.
5. Press A
7
to conrm.
The product is now in month adjustment mode.
6. Repeat steps 4 – 5 to set the month, date, hour and minutes.
Connecting the cu
1. Insert the rubber air tube A
3
into the air tube connector A
4
.
4
The connector must be completely inserted to prevent air leakage during blood pressure
measurements.
Applying the cu
1. Place the cu A
2
around a bare upper arm.
4
A
2
must be placed 1-2 cm above the elbow joint.
2. Choose an arm to measure on. Always measure on the same arm.
4
If A
2
is applied on the left arm, A
3
must be on the inside of the arm, aligned with the
middle nger.
4
If A
2
is applied on the right arm, A
3
must be at the side of the elbow.
4
A
2
should be tight but comfortable. It should be possible to insert a nger between the
arm and A
2
.
Body posture during measurement
Sitting down
1. Sit down.
2. Put your feet at on the oor.
3. Place your hand on a at surface with the palm up.
4
Do not rest your arm on A
3
. This may restrict the airow to A
2
.
4. Position your arm so A
2
is at the same height as your heart.
5. Sit calmly for 5 minutes before starting the blood pressure measurement.
Lying down
1. Lie on your back.
2. Place your arm straight along your side with the palm up.
3. Position your arm so A
2
is at the same height as your heart.
4. Lie calmly for 5 minutes before starting the blood pressure measurement.
Measuring blood pressure
1. Press A
7
.
4
All symbols - A
8
to A
y
- are shown on the display. If not all symbols are visible, contact
the service center.
The current memory group starts to blink in the place of A
t
.
4
Memory groups can be used to store measurements for multiple people on the same
device.
2. Press A
6
to switch memory groups.
3. Press A
7
to conrm.
4
The memory group is also conrmed automatically after 5 seconds of inactivity.
The display shows the most recent measurements.
If no measurements are stored in the memory group, the display shows zeroes.
The product starts to seek zero pressure.
A
2
inates until sucient pressure has built up for a measurement.
A
2
slowly deates while the measurement is carried out.
The results are shown on the display.
4
The measurements are automatically stored.
4. Press A
7
to switch o the display manually.
4
The display switches o automatically after 1 minute of inactivity.
Reading measurements from the memory
1. Press A
6
.
The current memory group is shown in the place of A
t
.
2. Press A
7
to switch memory groups.
3. Press A
6
to conrm.
4
The memory group is also conrmed automatically after 5 seconds of inactivity.
The display shows the average values of all measurements in the current memory group.
If no measurements are stored in the memory group, the display shows zeroes.
4. Press A
6
to show the average values of the last three measurements in the current
memory group.
5. Press A
6
to show the number of stored measurements in the current memory group.
6. Press A
6
to show the most recent measurements.
7. Press A
6
repeatedly to show the previous measurements.
8. Press A
7
to switch o the display manually.
4
The display switches o automatically after 1 minute of inactivity.
Deleting measurements from the memory
1. When the display shows a measurement, press and hold A
6
for three seconds to delete
all measurements in the current memory bank.
Technical alarm
If the measured blood pressure is outside the rated range, the display shows ‘Hi’ or ‘Lo’ as
technical alarm.
1. Check if the measurement was performed correctly.
2. If the measurement was performed correctly, consult your physician.


Csatlakozzon a termékről folytatott párbeszédhez
Itt megoszthatja véleményét a Nedis HCBL400WT Vérnyomásmérő-ról. Ha kérdése van, először figyelmesen olvassa el a kézikönyvet. Kézikönyv igénylése kapcsolatfelvételi űrlapunk segítségével történhet.