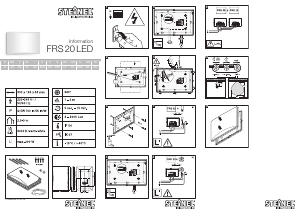
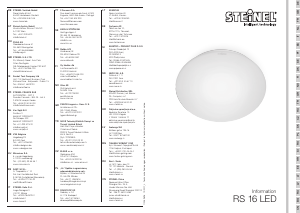
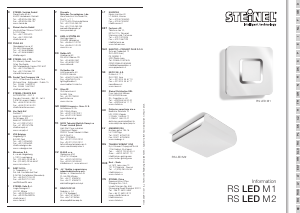
Használati útmutató Steinel RS LED M2 Lámpa
Kézikönyvre van szüksége a Steinel RS LED M2 Lámpa hez? Az alábbiakban ingyenesen megtekintheti és letöltheti a PDF kézikönyvet angol nyelven. Ez a termék jelenleg 7 gyakran ismételt kérdéseket, 0 megjegyzést tartalmaz, és 0 szavazattal rendelkezik. Ha nem ezt a kézikönyvet szeretné, kérjük, lépjen kapcsolatba velünk.
Hibás a terméke, és a kézikönyv nem kínál megoldást? Látogassa meg a Repair Café szolgáltatást ingyenes javítási szolgáltatásokért.
Használati útmutató
Loading…


Loading…
Értékelés
Ossza meg velünk, mit gondol a Steinel RS LED M2 Lámpa: értékelje a terméket. Szeretné megosztani a termékkel kapcsolatos tapasztalatát, vagy kérdése van? Írja megjegyzését az oldal alján lévő szövegdobozba.További információ erről a kézikönyvről
Megértjük, hogy jó, ha van egy papíralapú kézikönyv a Steinel RS LED M2 Lámpa-hoz. A kézikönyvet bármikor letöltheti weboldalunkról, és saját maga is kinyomtathatja. Ha szeretne egy eredeti kézikönyvet, javasoljuk, hogy lépjen kapcsolatba a következővel: Steinel. Esetleg tudnak adni egy eredeti kézikönyvet. Más nyelvű kézikönyvet keres Steinel RS LED M2 Lámpa készülékéhez? Válassza ki a kívánt nyelvet a honlapunkon, és keresse meg a modellszámot, hátha elérhető.
Műszaki adatok
| Márka | Steinel |
| Modell | RS LED M2 |
| Kategória | Lámpák |
| Fájltípus | |
| Fájl méret | 3.31 MB |
Steinel Lámpák összes kézikönyve
Lámpák további kézikönyvei
Gyakran Ismételt Kérdések a következővel kapcsolatban: Steinel RS LED M2 Lámpa
Ügyfélszolgálati csapatunk keresi a hasznos termékinformációkat, és válaszol a gyakran ismételt kérdésekre. Amennyiben pontatlanságot talál a gyakran ismételt kérdésekben, a kapcsolatfelvételi űrlapon jelezze nekünk a hibát.
Az összes LED-világítás tompítható? Ellenőrzött
Nem, nem minden LED lámpa tompítható. Ezt jelzi a csomagolás vagy maga a lámpa.
Hasznos volt (492) Olvass továbbÚj lámpát tettem a lámpámba, de nem kapcsol be, miért van ez? Ellenőrzött
Egyes lámpák meghatározott teljesítményű fényforrásokhoz készülnek. Ha olyan fényforrást helyez be, amely nagyobb teljesítményt igényel, mint amennyit a lámpa képes biztosítani, előfordulhat, hogy a fény nem kapcsol be. Ha a lámpa sokkal nagyobb teljesítményt nyújt, mint amire a fényforrás készült, akkor a fényforrás kiéghet.
Hasznos volt (348) Olvass továbbMiért fontos a fény színe? Ellenőrzött
Kétféle fény, meleg és hideg fény van. A hideg fény éles és ébren tart. A meleg fény pihentető hatást fejt ki. A fény melegét Kelvin-ben mérik, és maga a lámpa csomagolása is feltünteti.
Hasznos volt (283) Olvass továbbMit jelent a lumen? Ellenőrzött
A lumen egy adott fényforrás összes kibocsátott látható fénymennyiségének mértékegysége.
Hasznos volt (228) Olvass továbbMilyen csavaralapok léteznek? Ellenőrzött
Világszerte sokféle aljzat létezik, de a legtöbbet az Edison csavarra építik, amelyet E betűvel jeleznek. A legtöbb országban az E27 és E14 csavaros talpak szabványosak. Az Egyesült Államokban az E26, E17, E12 és E10 szabvány.
Hasznos volt (172) Olvass továbbMit mondanak a wattok a lámpámról? Ellenőrzött
A Watt a villamosenergia-fogyasztás mérőegysége. A több fényt kibocsátó lámpák általában több wattot használnak, de a fényteljesítmény összehasonlításához mindig használjon lumenet.
Hasznos volt (147) Olvass továbbMi az a LED? Ellenőrzött
A LED mozaikszó fénykibocsátó diódát jelent (Light-Emitting Diode).Fénykibocsátás történik annak hatására, ha a megfelelő irányban elektromos áramot vezetünk át a félvezetőn.
Hasznos volt (128) Olvass tovább


Csatlakozzon a termékről folytatott párbeszédhez
Itt megoszthatja véleményét a Steinel RS LED M2 Lámpa-ról. Ha kérdése van, először figyelmesen olvassa el a kézikönyvet. Kézikönyv igénylése kapcsolatfelvételi űrlapunk segítségével történhet.