Használati útmutató EMOS E5018 Meteorológiai állomás

Kézikönyvre van szüksége a EMOS E5018 Meteorológiai állomás hez? Az alábbiakban ingyenesen megtekintheti és letöltheti a PDF kézikönyvet angol nyelven. Ez a termék jelenleg 5 gyakran ismételt kérdéseket, 1 megjegyzést tartalmaz, és 12 szavazattal rendelkezik, a termék átlagos értékelése 67/100. Ha nem ezt a kézikönyvet szeretné, kérjük, lépjen kapcsolatba velünk.

Hibás a terméke, és a kézikönyv nem kínál megoldást? Látogassa meg a Repair Café szolgáltatást ingyenes javítási szolgáltatásokért.

Használati útmutató

Loading…

2
AOK-5018B WIRELESS WEATHER STATION
The weather station displays the time along with 2 alarm clocks with snooze function, the weather forecast, interior and exterior temperatures, humidity,
the atmospheric pressure, lunar phase, the sunrise and sunset times, and also the moonrise and moonset times.
It has a memory for the minimum and maximum measured values.
Please read this product guide thoroughly before using the device.
GB
Specications:
Radio controlled clock
Accuracy: ±2 °C
Interior/exterior temperatures: 0 °C to +50 °C; -50 °C to +70 °C
Temperature resolution: 0.1 °C
Wireless sensor: broadcast frequency 433 MHz
Radio signal range: up to 30 m in free space
Number of sensors: 3
Relative humidity: 20 % – 95 %
Resolution: 1 %
Accuracy: ±5 %
Barometer pressure scale: 850 hPa to 1050 hPa
Power supply:
a) main station: 2× 1.5 V AA battery (not included)
b) sensor: 2× 1.5 V AAA battery (not included)
Size and weight:
a) main station: 189 × 139 × 30 mm; 306 g (without batteries)
b) sensor: 60 × 99 × 21 mm; 43 g (without batteries)
List of icons and buttons
Front display
A – interior temperature below
+4 °C
B – weather forecast icon
C – pressure trend
D – depleted battery icon
E – exterior sensor number
F – temperature trend
G – humidity trend
H – exterior temperature and
humidity
I – interior temperature and
humidity
J – physical comfort icon
K – date, day of the week, week
number
L – DCF77 radio signal reception
icon
M – alarm clock icons
N – current time
O – moonrise and moonset
P – country and city code
R – sunrise and sunset
S – lunar phase icon
T – pressure value and history
Rear side
Button push Button hold (3 seconds)
CHANNEL Sensor number Search for sensor No. 1,2 3
HISTORY
Pressure history over the
last 12 hours
Setting of altitude above sea
level, pressure units, weather
icon
-
1 step back
Display temperatures in
°C or °F units
Thermal limit setting
+
1 step forward
Display max/min tem
-
perature and humidity
values
MODE Alarm time No. 1, 2
Setting the alarm, time and
date
RESET Erase all values
Upper side
SNOOZE/LIGHT – Display light and snooze functions
Wireless sensor
Front side
- external temperature
- external humidity
CH1,2,3 – No. of channel reserved for communication of the sensor with
the weather station
Rear side
CH – switching for sensor channel
°C/°F – temperature units
Commissioning
1. First insert the battery into the weather station (2× AA), then to the
wireless sensor (2× AAA). When installing the batteries, ensure correct
polarity to avoid damaging the weather station or the sensor. Use alka
-
line batteries of the same type only; do not use rechargeable batteries.
2. Position both units next to each other. The weather station will nd
the signal from the sensor within three minutes. If the sensor signal
is not found, hold the CHANNEL button to repeat the search.
3. If the external temperature value vanishes from the display, push
theRESET button on the weather station. The weather station resets
all values to zero and nds the sensor signal again.
4. We recommend positioning the sensor on the northern side
of the house. In built-up areas, the sensor range may drop rapidly.
5. The sensor is resistant to splash and dripping water; do not subject
it to permanent contact with adverse weather and rain.
6. Do not put the sensor on metal surfaces; it might weaken the signal.
7. If the weak battery icon (D eld) appears, replace the batteries in the
sensor or the weather station.
Channel change and connecting more sensors
1. Use the CHANNEL button on the rear of the weather station to choose
the desired sensor channel - 1, 2 or 3. Then hold the CHANNEL button
until the icon starts blinking.
2. On the rear side of the sensor, remove the battery compartment cover
and insert the batteries (2× AAA).
3. Set the required number of the sensor channel - 1, 2, 3 using the CH
button – it will be shown on the front display. Within 3 minutes the
data from the sensor will be read.
4. If the sensor signal is not found, remove the battery and reinsert.
Radio controlled clock (DCF77)
After logging to the wireless sensor, the weather station starts to automa-
tically search for the DCF77 signal over 7 minutes, the L icon is blinking.
During the search no data on the display are updated and the buttons do
not function (except SNOOZE/LIGHT).
Signal found – the icon stops blinking and it shows the current time.
Signal not found – the icon disappears.
To start a new search for the DCF77 signal push the buttons + and – at
the same time.
To cancel the DCF77 signal search, push the buttons + and – at the same
time again.
The DCF77 signal will be synchronised daily between 2:00 and 3:00 a.m.
To ensure correct signal reception, do not place the sensor near electrical
appliances and mobile phones.
Manual setting of the time, date and location to
show the time of sunrise, sunset, moonrise and
moonset
1. Hold the MODE button
2. Use the buttons + and – to set the year – month - day – time shift – day
language - 12/24 time format – hour – minute – city (country) code.
Other cities and countries are listed on page 22 - 23.
3. The week number is set automatically according to the set date.
4. You can move from one value to another by pushing the MODE button.
5. After setting the city code, the weather station will set the time of
sunrise and sunset (R eld) and moonrise, moonset (O eld).
Interior and exterior temperatures, humidity,
temperature unit
The interior temperature and humidity is displayed in eld I.
Exterior temperature and humidity is displayed in eld H.
Button – choose the temperature unit °C/°F.
Temperature and humidity trend
The arrow shows the trend in the measured values of temperature (F icon)
and humidity (G icon) for the specic sensor or station.
Indicators on the
display
Temperature and humi-
dity trend
Rising Stable Falling
Magyar nyelvű használati útmutató letöltése (PDF, 1.02 MB)
(Gondoljon a környezetre, és csak akkor nyomtassa ki a kézikönyvet, ha feltétlenül szükséges)

Loading…

Értékelés

Ossza meg velünk, mit gondol a EMOS E5018 Meteorológiai állomás: értékelje a terméket. Szeretné megosztani a termékkel kapcsolatos tapasztalatát, vagy kérdése van? Írja megjegyzését az oldal alján lévő szövegdobozba.
Elégedett a EMOS E5018 Meteorológiai állomás-szal?
Igen Nem
67%
33%
12 szavazás

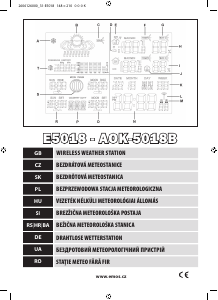
Csatlakozzon a termékről folytatott párbeszédhez

Itt megoszthatja véleményét a EMOS E5018 Meteorológiai állomás-ról. Ha kérdése van, először figyelmesen olvassa el a kézikönyvet. Kézikönyv igénylése kapcsolatfelvételi űrlapunk segítségével történhet.

Alexa 25-04-2021
Nagyon tetszik a termék, viszont bizonyos időközönként csipog, ami éjszaka elég idegesítő... Tudom, hogy valamit jelez, de nem igazán jövök rá pontosan mit és sehol nem találom hogyan is lehetne a csipogást elhallgattatni. nem folyamatosan csipog, csak egyet-egyet, de sajna így sem tudom megszokni. Választ köszönöm :)

válasz | Hasznos volt (0)

További információ erről a kézikönyvről

Megértjük, hogy jó, ha van egy papíralapú kézikönyv a EMOS E5018 Meteorológiai állomás-hoz. A kézikönyvet bármikor letöltheti weboldalunkról, és saját maga is kinyomtathatja. Ha szeretne egy eredeti kézikönyvet, javasoljuk, hogy lépjen kapcsolatba a következővel: EMOS. Esetleg tudnak adni egy eredeti kézikönyvet. Más nyelvű kézikönyvet keres EMOS E5018 Meteorológiai állomás készülékéhez? Válassza ki a kívánt nyelvet a honlapunkon, és keresse meg a modellszámot, hátha elérhető.

Műszaki adatok

Márka EMOS
Modell E5018
Kategória Meteorológiai állomások
Fájltípus PDF
Fájl méret 1.02 MB

EMOS Meteorológiai állomások összes kézikönyve
Meteorológiai állomások további kézikönyvei

Gyakran Ismételt Kérdések a következővel kapcsolatban: EMOS E5018 Meteorológiai állomás

Ügyfélszolgálati csapatunk keresi a hasznos termékinformációkat, és válaszol a gyakran ismételt kérdésekre. Amennyiben pontatlanságot talál a gyakran ismételt kérdésekben, a kapcsolatfelvételi űrlapon jelezze nekünk a hibát.

Időjárásjelző állomásom esőt jelzett, de mégsem esett.Ez hogy lehet? Ellenőrzött

Az időjárásjelző állomás előrejelzésének alapja a légnyomás mérése.Az alacsony légnyomás általában rossz időt, míg a magas légnyomás jó időt jelent.Előfordulhat, hogy az időjárási viszonyok másképp alakulnak, mint ahogy azt a légnyomás előrejelzi.

Hasznos volt (1404) Olvass tovább

Mi a legjobb hely egy meteorológiai állomás és érzékelői számára? Ellenőrzött

Maga az időjárási állomás bent van elhelyezve, és távol kell tartani olyan hőforrásoktól, mint a konyha, ablakok vagy elektromos készülékek. Külön külső hőmérséklet-érzékelőt kell árnyékban elhelyezni, és legalább 1,25 m-rel a talaj felett. Az esőérzékelőt egy nyílt helyre kell helyezni, ahol mindig összegyűjtheti az esőt. A szélérzékelőt is szabad helyre kell helyezni, minden akadály befolyásolhatja a szelet.

Hasznos volt (334) Olvass tovább

A meteorológiai állomásomon esőmérő van, meg tudja mérni a havazás mennyiségét is? Ellenőrzött

Néhány esőmérő fűtőelemmel van felszerelve, így a hó elolvad és mérhetővé válik. Fűtőelem nélkül az esőmérő eltömődik és mérés nem hajtható végre.

Hasznos volt (235) Olvass tovább

A készülékemben lévő akkumulátor oxidálódott, továbbra is biztonságosan használhatom? Ellenőrzött

Ja, az eszköz továbbra is biztonságosan használható. Először vegye ki az oxidizd akkumulátort. Ehhez soha ne használjon puszta kezet. Ezután tisztítsa meg az elemtartót egy ecetbe vagy citromlébe mártott vattával. Hagyja megszáradni és helyezzen be új elemeket.

Hasznos volt (234) Olvass tovább

Hagyhatok hosszabb ideig cserélhető akkumulátort egy eszközben? Ellenőrzött

A cserélhető akkumulátorok sokáig maradhatnak egy eszközben, ha a készüléket használják. Ha egy eszközt hosszú ideig tárolnak, az oxidáció elkerülése érdekében tanácsos eltávolítani az elemeket.

Hasznos volt (234) Olvass tovább
Használati útmutató EMOS E5018 Meteorológiai állomás

Kapcsolódó termékek

Kapcsolódó kategóriák