GB
GB GB GB GB GB GB GB GB GB GB GB
GB GB GB GB GB GB GB GB GB GB GB
GB GB GB GB GB GB HU
HU
GB
Nyugtázza a választását a SET gomb meg-
nyomásával.
Ismételje meg ezt a folyamatot az összes
következő számjegyre. Most bekerül a karban-
tartási időköz kiválasztásba.
Annyiszor nyomja meg a MODE gombot, míg
az Ön által kívánt kilométerszám meg nem
jelenik, mely után el kívánja végeztetni kerék-
párjának a következő karbantartását (karbant-
artási időszak kijelzése
14
).
Tudnivaló: választható a 200, 400, 600 és
800 km ill. a mérföld.
Miután jóváhagyta a beállítást, a kerékpár-szá-
mítógép elkezdi számolni az útszakaszt. Ha
mgjelenik a karbantartási-időköz
14
jelzés az
LC-kijelzőn, ellenőriznie kell a kerékpár állapo-
tát (kopás, fékbeállítások, stb.). Végül nyomja
meg a SET-gombot
12
, a karbantartási-időköz
visszaállíásához és ennek a jelzésnak a
– Háttér megvilágítás
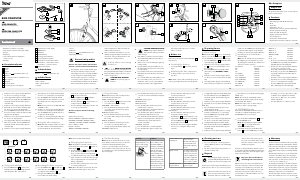
Alkatrészleírás
1a
Rögzítés
1b
Szenzor
1c
Fékezés
2
Mágnes
3
3 V-os elem (egyenáram), CR2032 típusú
gombelem
4
Kábelkötöző
5
Kerékpár computer elemrekesz-fedél
6
Kerékpár computer
7
LC- kijelző
8
Funkció kijelző
9
Időfunkciók értékének kijelzése
10
Főfunkció értékének kijelzése
11
MODE-gomb
12
SET-gomb
13
SCAN kijelző
14
Karbantartási időköz kijelző
set basic setting data (language, age, weight,
time). The rest of the stored data will be deleted
(except total trip time and total odometer).
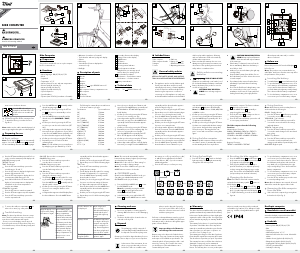
Changing the batteries
Note: The batteries of the bike computer must be
replaced when the battery symbol
17
appears on
the LC display
7
.
Press the MODE key
11
and the SET key
12
at the same time and keep them pressed until
the {{-----}} symbol appears in the LC display
7
.
To replace the battery, proceed as shown in
figure A.
To open the battery compartment cover, use a
coin to assist you to turn the battery compart-
ment cover in anti-clockwise direction. Take out
the old battery and replace with a new bat-
tery. Make sure you fit the battery the right
way round (polarity). This is shown inside the
battery compartment.
repeatedly until the desired number appears
as the first digit (see Fig. K).
Confirm your choice by pressing the SET button.
Repeat this process for all the remaining digits.
You move on to selecting the time format.
Press the MODE button repeatedly until 12 for
the 12-hour format or 24 for the 24-hour format
appears in the LC display.
Confirm your choice by pressing the SET button.
You move on to setting the time.
A four-digit number appears in the LC display.
Enter the current time. Press the MODE button
repeatedly until the desired number appears
as the first digit.
Confirm your choice by pressing the SET button.
Repeat this process for all the remaining digits.
You move on to selecting the servicing interval.
Press the MODE button repeatedly until the
desired number of units of distance to your
Bike Computer
Introduction
We congratulate you on the purchase of your new
product. You have chosen a high quality product.
The instructions for use are part of the product.
They contain important information concerning
safety, use and disposal. Before using the product,
please familiarise yourself with all of the safety
information and instructions for use. Only use the
product as described and for the specified applica-
tions. If you pass the product on to anyone else,
please ensure that you also pass on all the docu-
mentation with it.
Proper use
The product is intended for use as a bike computer.
Not for commercial use.
HU
jelenik a kívánt számérték első számjegye
(lásd K- ábra).
Nyugtázza a választását a SET gomb
megnyomásával.
Ismételje meg ezt a folyamatot az összes
következő számjegyre. Most bekerül az
időrendszer kiválasztásba.
Annyiszor nyomja meg a MODE gombot, míg
az LC-kijelzőben meg nem jelenik a 12 a 12
órás formátumhoz vagy a 24 a 24 órás formá-
tumhoz.
Nyugtázza a választását a SET gomb meg-
nyomásával. Most bekerül a pontos idő beállí-
tásba.
Az LC-kijelzőben megjelenik egy négyjegyű
szám. Vigye be az aktuális pontos időt. Ehhez
annyiszor nyomja meg a MODE gombot, míg
meg nem jelenik a kívánt számérték első
számjegye.
Funkciók
– Menü nyelvek: GB, DE, FR, NL, IT, ES
– Óra
– Stopperóra
– Hőmérséklet kijelzés °C / °F
– Memória funkcióval a min. és max.
hőmérsékletekhez
– Utazási sebesség kijelzés (0–99,9 km / h)
– Átlagsebesség kijelzés (0–99,9 km / h)
– Legnagyobb sebesség kijelzés (0–99,9 km / h)
– Sebesség összehasonlítás
– Szokványos sebesség
– Menetidő időzítő (max. 9:59:59) (vissza vagy
előre számlálással)
– Kilométer számláló (vissza vagy előre számlálással)
– Összesen megtett kilométer és összes idő kijelzés
– Kalória számláló
– Zsírégetés kijelzés
– Scan-kijelzés (egymás után minden funkció
megjelenik)
HUGB
Resetting the bike computer
Press the MODE button
11
and SET button
12
at the same time and keep them pressed until
{{----}} appears in the LC display
7
.
Now press the MODE button and keep it
pressed. This allows you to adjust the previously
Now select your desired unit of distance and
speed. Press the MODE button repeatedly until
SET KM KMH or SET MILE MPH appears in
the LC display.
Confirm your choice by pressing the SET button.
You move on to entering your age.
A two-digit number appears in the LC display.
Now enter your age. Press the MODE button
repeatedly until the desired number appears
as the first digit.
Confirm your choice by pressing the SET butto
n.
Repeat this process for the remaining digit. You
move on to selecting the unit of weight.
Press the MODE button repeatedly until SET
KG or SET LB appears in the LC display.
Confirm your choice by pressing the SET button.
You move on to entering your weight.
A three-digit number appears in the LC display.
Now enter your weight. Press the MODE button
HU HU HU HU HU HU HU HU HU
HU
Functions
– Menu languages: GB, DE, FR, NL, IT, ES
– Clock
– Stopwatch
– Temperature °C / °F
– Memory function for min. and max. temperature
– Current speed (0–99.9 km / h)
– Average speed (0–99.9 km / h)
– Maximum speed (0–99.9 km / h)
– Speed comparison
– Speed tendency
– Trip timer (max. 9:59:59) (count backwards or
forwards)
– Odometer (count backwards or forwards)
– Total odometer and total cycling time display
– Calories
– Fat-burnt
– Scan indicator (functions displayed in
continuous loop)
– Backlight
Description of parts
1a
Bracket
1b
Sensor
1c
Cushion
2
Magnet
3
Battery 3 V (Direct current), type CR2032
button cell
4
Cable tie
5
Bike computer’s battery compartment cover
6
Bike computer
7
LC display
8
Function indicator
9
Secondary function value display
10
Primary function value display
11
MODE button
12
SET button
13
SCAN indicator
14
Servicing interval indicator
15
Speed comparison indicato
r
▲ higher than your average speed
▼ lower than your average speed
16
Speed tendency indicator:
Acceleration – anticlockwise
rotation
Decelerat
ion – clockwise rotation
17
Battery state indicator
Technical data
Battery: 3 V (Direct current)
(CR2032 button cell)
Operating temperature: 0–50 °C
Included items
1 Bike computer
1 Bracket with sensor
1 Magnet
6 Cable ties
1 Battery 3 V
(Direct
current), type CR2032
button cell
1 Operating instructions
General safety advice
KEEP ALL THE SAFETY ADVICE AND INSTRUC-
TIONS IN A SAFE PLACE FOR FUTURE REFERENCE!
This product can be used by children aged from
8 years and above and persons with reduced
physical, sensory or mental capabilities or lack
of experience and knowledge if they have been
given supervision or instruction concerning use
of the product in a safe way and understand
the hazards involved. Children shall not play
with the product. Cleaning and user mainte-
nance shall not be made by children without
supervision.
Please note that the warranty does not cover
damage arising from improper treatment, non-
observance of the operating instructions and
safety advice or unauthorised use.
Safety advice
concerning batteries
RISK OF LOSS OF LIFE!
If batteries are swallowed, it can lead to loss of
life. Seek medical attention if a battery is swal
lowed.
Remove the battery if the product is not to be
used for a long period.
CAUTION! RISK OF EXPLO-
SION! Never recharge single-use
batteries!
CAUTION! DANGER OF EXPLO-
SION! Always replace all batteries
at the same time and only use batte
ries
of the same type.
If the battery is exhausted, remove it from the
product immediately. Otherwise the battery is
more likely to leak.
Make sure you insert the battery the right way
round (polarity).
Keep the battery away from children. Do not
throw the battery into a fire. Never short-circuit
it or take it apart.
If your battery leaks, remove it from the product
immediately to prevent the product from being
damaged.
Do not let the fluid from a leaking battery come
into contact with your skin, eyes or mucous
membranes. In the event of contact with fluid
leaking from a battery, thoroughly flush the
affected area with water and / or seek the
advice of a doctor!
Before use
Remove the protective foil from the LC display
7
before first use.
Note: This product is not recommended to use
with E-bikes. Interference from the motor may affect
the performance of the product.
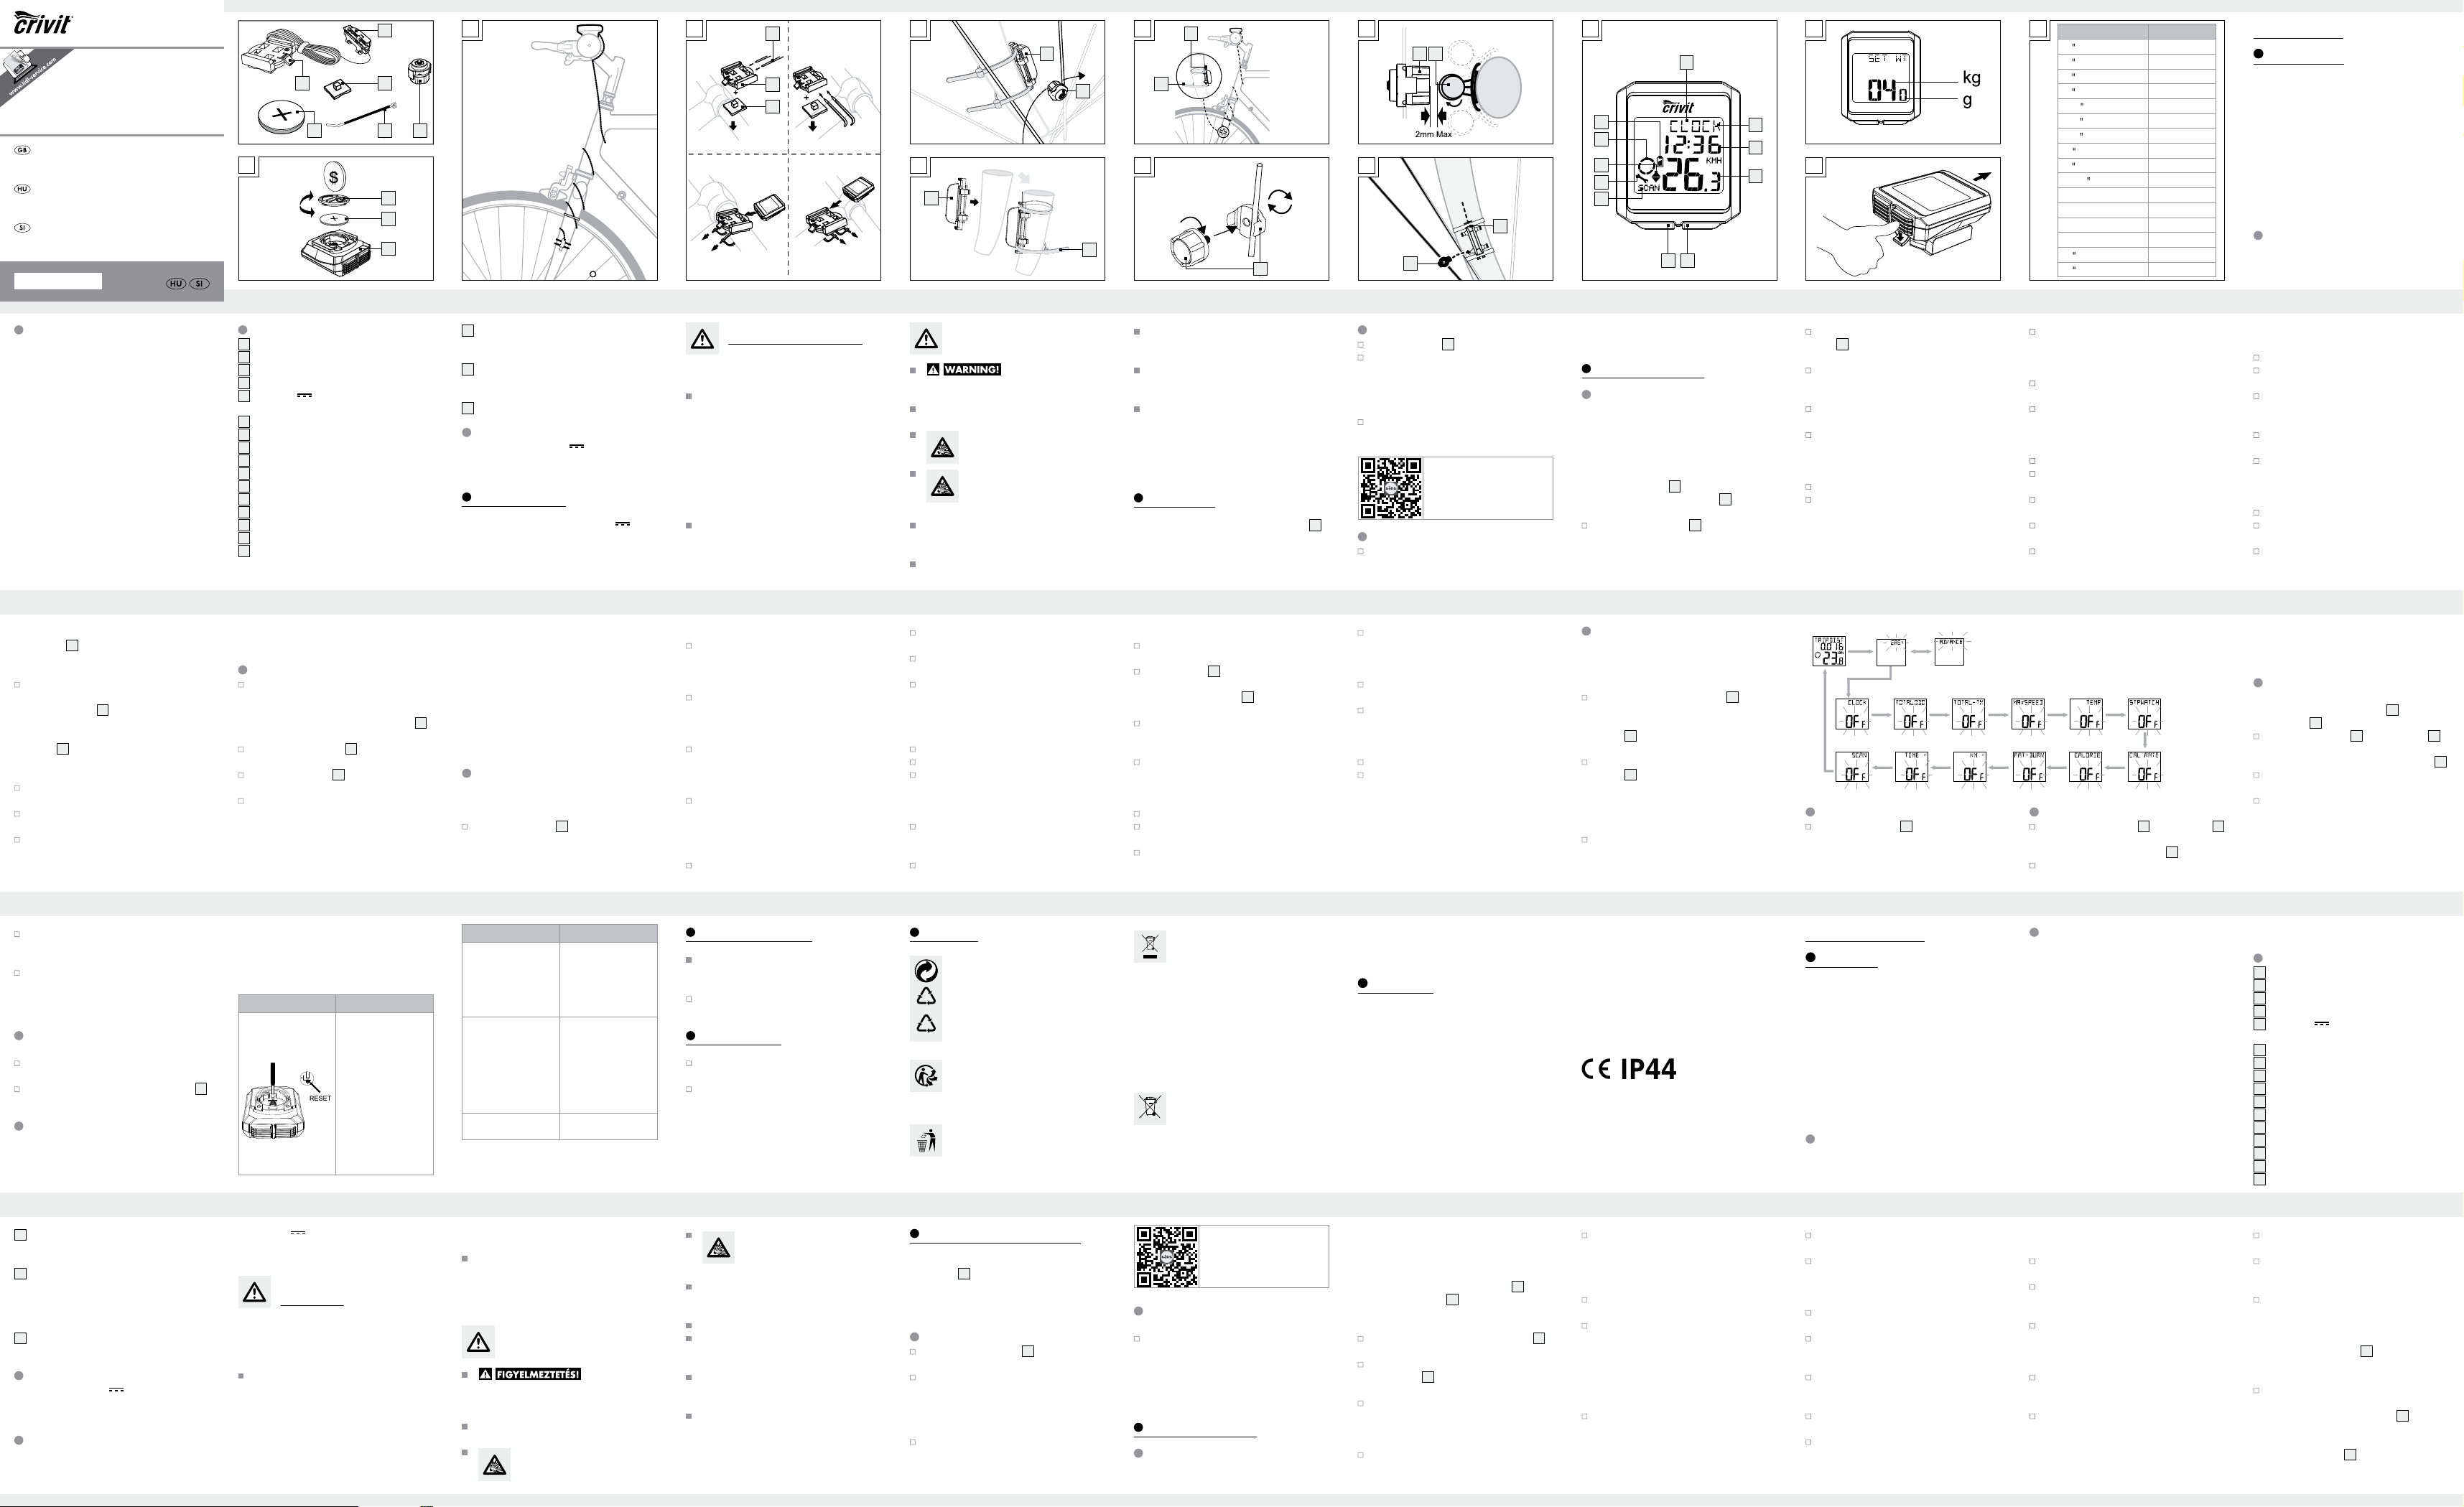
Inserting the battery
To insert the battery
3
, proceed as shown in Fig. A.
To open the battery compartment cover, use a
coin to assist you to turn the battery compartment
cover in anti-clockwise direction. Make sure
you fit the battery the right way round (polarity).
This is shown on the back side of the product.
To close the battery compartment cover, use a
coin to assist you to turn the battery compart-
ment cover in clockwise direction.
Scan the QR code with your
smartphone and watch the
video to find out how to assem-
ble the product.
Attaching the bike computer
To attach the product, proceed as shown in
Figs. B to I.
Note: Make sure the cable is attached properly. It
must not get caught in the spokes or trail along them.
Preparing for use
Basic settings
Basic setting: Language > User profile > Wheel
size > Unit of distance and speed > Age > Unit of
weigh > Weight > Time format > Time > Servicing
interval > Unit of temperature
Key functions: MODE button for selection / SET
button for confirmation
Note: The LC display
7
comes on automatically
approx. 2 seconds after the battery
3
is inserted.
You are immediately offered a choice of languages.
Press the MODE-button
11
repeatedly until the
desired language appears.
Confirm your choice by pressing the SET but-
ton
12
. You move on automatically to select
the user profile.
Press the MODE button repeatedly until the
desired
user profile (ADVANCE or EASY)
appears.
Confirm your choice by pressing the SET button.
Now you can choose the wheel size (SET WS).
A four-digit number appears in the LC display.
Now enter the tyre circumference of your wheel
in mm. Press the MODE button repeatedly until
the desired number appears as the first digit.
Confirm your choice by pressing the SET button.
Repeat this process for each of the three
remaining digits.
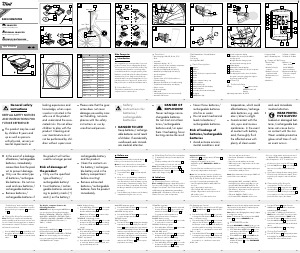
Note: You can calculate your tyre circumfer-
ence by multiplying your tyre diameter by 3.1416
.
The list (the fig. M) contains the tyre circumfer-
ences (U) of the most common tyre diameters (D).
next intended bike servicing (servicing interval
indicator
14
) appears in the LC display.
Note: You have the choice of 200, 400, 600
or 800 km or miles.
After the setting is confirmed, the bike computer
will count the trip distance. When the servicing
interval indicator
14
shows on LC display, you
need to check the condition of your bike (wear,
adjustment of brakes, etc.). Then press the SET
button
12
to reset the service interval and this
indicator to disappear. The bike computer will
start counting the trip distance again.
Confirm your choice by pressing the SET button.
You move on to selecting the unit of temperature.
Press the MODE button repeatedly until °C or
°F appears in the LC display.
Confirm your choice by pressing the SET button.
You have now completed the the basic settings.
If you want to change the basic setting data,
follow the steps in “Resetting the bike computer”
section and reset all basic setting data again.
Using the bike computer
Note: If the bike computer remains unused for
more than 5 minutes, it automatically switches
into the stand-by mode. Press any button to reac-
tivate the computer. The function indicator
8
shows the current mode.
Press the MODE button
11
repeatedly to page
through the various modes.
Press the SET button
12
to change into the sec-
ondary function for any function.
Press the SET button and keep it pressed to call
or reset up any saved values.
The bike computer has the following
functions:
ADVANCE mode:
CLOCK > TOTALODO > TOTAL-TM > TRIPDIST >
MAXSPEED > AVGSPEED > TRIPTIME > TEMP >
STPWATCH > CAL RATE > CALORIE > FAT-BURN
> KM+/- > TIME+/- > SCAN
EASY mode:
TRIPDIST > AVGSPEED > TRIPTIME
Using functions
Note: All the functions and secondary functions
are described in the following list.
CLOCK: - Displays the time
Press the SET button
12
and keep it
pressed for
3 seconds to access the time settings.
TOTAL ODO: - Total odometer
Press the SET button and keep it pressed for
3seconds to access the wheel size settings
and total distance.
TOTAL-TM: Total time cycling
Press the SET button and keep it pressed for
3seconds to make changes to the saved total
time cycling.
TRIPDIST: Trip distance
Press the SET button and keep it pressed for
3seconds to reset the trip distance, the
average speed and the trip time displays to 0.
MAXSPEED: Highest speed
Press the SET button and keep it pressed for 3sec-
onds to reset the maximum speed display to 0.
AVGSPEED: Average speed
TRIPTIME: Trip time
TEMP: Thermometer
Press the SET button and keep it pressed to
switch between °C and °F.
Press the SET button to display the highest tem-
perature (HI) measured so far.
Press the SET button again to display the lowest
temperature (LO) measured so far.
Press and hold down the SET button while the
highest or lowest temperature is displayed to
switch back to the current temperature to
reset the saved data.
STPWATCH: Stopwatch
Press the SET button to start the stopwatch.
Press the SET button again to stop the stopwatch.
Press the SET button and keep it pressed to
reset the stopwatch to 0.
CAL RATE: Current calorie consumption
CALORIE: Calorie meter
Press the SET button and keep it pressed to
reset the calorie counter to 0.
FAT-BURN: Fat burning in grams
Press the SET button and keep it pressed to
reset the fat burning value to 0.
KM: Odometer
Press the SET button and keep it pressed to
change the odometer settings.
The LC display
7
shows the symbol for count-
ing forwards or
backwards (+ or - respectively).
Press the MODE button
11
repeatedly until the
desired symbol is shown.
Confirm your choice by pressing the SET button.
You move on to setting the distance on the
odometer.
A 5-digit number appears in the LC display. En
ter
the desired distance. Press the MODE button
repeatedly until the desired number appears
as the first digit.
Confirm your choice by pressing the SET button.
Repeat this process for all the remaining digits.
TIME: Timer
Press the SET button and keep it pressed to
change the timer settings.
The LC display shows the symbol for counting
forwards or backwards (+ or - respectively).
Press the MODE button repeatedly until the
desired symbol is shown.
Confirm your choice by pressing the SET button.
You move on to the time settings of the timer.
A 5-digit number appears in the LC display.
Enter the desired time. Press the MODE button
repeatedly until the desired number appears
as the first digit.
Confirm your choice by pressing the SET button.
Repeat this process for all the remaining digits.
SCAN: Scan
Note: The scan mode automatically switches
between the trip distance, highest speed, average
speed and trip time displays.
Note: Refer to the section on “Basic settings” to
see how you make or change settings.
Note: To turn off the SCAN function, press the
MODE button to return to clock mode.
CUSTOMIZE mode
Apart from the ADVANCE and EASY mode, you
can make your individual adjustments in the
CUSTOMIZE mode (see procedure).
Press and hold the MODE button
11
to enter
the CUSTOMIZE mode.
Note: By repeatedly pressing the MODE
button
11
, you can toggle between the
ADVANCE and EASY modes.
In the EASY mode, press and hold the SET
button
12
. Press the MODE button to switch
the settings on or off (e.g. time). Choose „On“,
to add the chosen adjustment to the EASY
modes. Choose „Off“, if you do not want to
add the adjustments.
Press the SET button, to confirm your entry.
Using the backlight
Press the SET button
12
to switch on the back-
light temporarily. The backlight automatically
extinguishes after a short period.
To close the battery compartment cover, use a
coin to assist you to turn the battery compart-
ment cover in clockwise direction.
Press the SET key and keep it pressed to return
to normal operating mode.
Note: Once the batteries are removed, all stored
data will be erased after approx. 20 seconds.
Removing the bike computer
from the bike
Slide out the bike computer by pressing down
the bracket lock (See Fig. L).
Cut off the protruding tails of the cable ties
4
with a suitable tool such as diagonal pliers.
Troubleshooting
Note: This product has delicate electronic compo-
nents. Therefore interference may occur when it is
near products which transmit radio signals.
- If errors occur in the display, remove any such
products from the vicinity of the product. In the
case of such malfunctions, remove the battery briefly
and then reinsert again.
Problem Solution
Empty LC-display or no
response after putting
the batteries in again
Remove battery. Insert
a sharp object (e.g.
screwdriver) into the
hole marked with “RE-
SET”. Insert a 3 V bat-
tery into the battery
compartment in such a
way that the + terminal
points upwards. Replace
the battery cover on the
battery compartment.
The microprocessor is
reset and restarted.
Problem Solution
Speed or distance are
not displayed.
Adjust magnet and
sensor correctly.
- Check that the battery
is inserted with the
poles arranged the
right way round.
Display is black The ambient tempera-
ture is too high or the
bike computer was ex-
posed to direct sunlight
for too long. Remove
product from direct sun-
light and let it cool off
for a while.
The LC-display shows
irregular symbols.
Remove battery and
replace it again.
Cleaning and care
Do not use any liquids or cleaning agents for
cleaning. Otherwise there is a risk of damaging
the product.
The product should only be cleaned on the
outside with a soft, dry cloth.
Maintenance
Remove the battery when the product will not
be used for longer period of time.
Check regularly the cable and components for
any damage and safe fit.
Disposal
21
PAP
1
PET
The packaging is made entirely of recy-
clable materials, which you may dispose
of at local recycling facilities.
The inlay is made of fibreboard (PAP 21).
The blister pack is made of plastic (PET 1).
The Green Dot is not valid for Germany.
The product and packaging materials
are recyclable, dispose of it separately
for better waste treatment. The Triman
logo is valid in France only.
Contact your local refuse disposal
authority for more details of how to
dispose of your worn-out product.
cadmium, Hg = mercury, Pb = lead For this reason,
you must dispose of discarded batteries at a com-
munal disposal centre.
Warranty
The product has been manufactured to strict quality
guidelines and meticulously examined before deli-
very. In the event of product defects you have legal
rights against the retailer of this product. Your legal
rights are not limited in any way by our warranty
detailed below.
The warranty for this product is 3 years from the date
of purchase. Should this product show any fault in
materials or manufacture within 3 years from the
date of purchase, we will repair or replace it – at
our choice – free of charge to you.
The warranty period begins on the date of purchase.
Please keep the original sales receipt in a safe
location. This document is required as your proof
In the interest of the environment, do not
throw out your product with your house-
hold refuse. Take it to a suitable centre
where it can be disposed of properly.
Your local council will be able to tell you
where the collection centres are located
and their opening times.
Faulty or used batteries must be recycled in accord-
ance with Directive 2006 / 66 / EC and its amend-
ments. Return the batteries and / or the product
through the appropriate collection facilities.
Improper disposal of batteries
can damage the environment!
Batteries must not be disposed of with the household
refuse. They may contain toxic heavy metals and
require to be handled as special waste. The
chemical symbols of heavy metals are: Cd =
of purchase. This warranty becomes void if the pro-
duct has been damaged, or used or maintained
improperly.
The warranty applies to defects in material or
manufacture. This warranty does not cover product
parts subject to normal wear, thus possibly conside-
red consumables (e.g. batteries) or for damage to
fragile parts, e.g. switches, rechargeable batteries
or glass parts.
Kerékpár computer
Bevezető
Gratulálunk új termékének vásárlása alkalmából.
Ezzel a döntésével vállalatunk értékes terméke
mellett döntött. A használati utasítás ezen termék
része. A biztonságra, a használatára és a meg-
semmisítésre vonatkozó fontos tudnivalókat tartal-
mazza. A termék használata előtt ismerje meg az
összes használati és biztonsági tudnivalót. A termé-
ket csak a leírtak szerint és a megadott felhaszná-
lási területeken alkalmazza. A termék harmadik
személy számára való továbbadása esetén kézbe-
sítse vele annak a teljes dokumentációját is.
Rendeltetésszerű használat
A terméket kerékpár computerként lehet alkal-
mazni. Nem ipari alkalmazásra való.
15
Sebességösszehasonlítás kijelzése
▲ az Ön átlagos sebességénél magasabb
▼ az Ön átlagos sebességénél alacsonyabb
16
Sebesség-kijelző:
gyorsulás– az óra járásával ellentétes irányú
forgás
lassulás– az óra járásával megegyező irányú
forgás
17
Az elemekre vonatkozó kijelzések
Műszaki adatok
Elem: 3 V (egyenáram)
CR2032 típusú gombelem
Üzemi hőmérséklet: 0–50 °C
A csomag tartalma
1 Kerékpár computer
1 Tartó szenzorral
1 Mágnes
6 Kábelkötöző
1 3 V-os elem
(egyenáram) CR2032
típusú gombelem
1 Használati útmutató
Általános biztonsági
utasítások
ŐRIZZEN MEG MINDEN BIZTONSÁGI
TUDNIVALÓT ÉS UTASÍTÁST A JÖVŐBENI
FELHASZNÁLÁS CÉLJÁBÓL!
A terméket 8 éves kor feletti gyermekek, vala-
mint korlátozott fizikai, érzékszervi vagy szel-
lemi képességgel élő vagy nem megfelelő
tapasztalattal és tudással rendelkező szemé-
lyek csak felügyelet mellett, illetve a termék
biztonságos használatára vonatkozó felvilágo-
sítás és a lehetséges veszélyek megértése után
használhatják. A gyermekek nem játszhatnak
a termékkel. A tisztítást és az ápolást gyerme-
kek felügyelet nélkül nem végezhetik.
Kérjük, tartsa szem előtt, hogy a garancia olyan
károkra nem vonatkozik, amelyek a szakszerűt-
len kezelés, a Használati - és Biztonsági útmu-
tató figyelmen kívül hagyásának, vagy a
jogosulatlan használatnak a következményei.
Biztonsági tudnivalók az
elemekkel kapcsolatban
ÉLETVESZÉLY!
Az elemeket le lehet nyelni, és az életveszélyes
lehet. Ha valaki egy elemet lenyelt, vegye
azonnal igénybe egy orvos segítségét.
Távolítsa el az elemet a termékből, ha hosz-
szabb ideig nem használja azt.
VIGYÁZAT! ROBBANÁSVE-
SZÉLY! Soha ne töltse fel újra az
elemeket!
VIGYÁZAT! ROBBANÁSVE-
SZÉLY! Cserélje ki mindig egyszerre
az összes elemet és egyszerre csak
azonos típusú elemeket használjon.
Távolítsa el a lemerült elemeket azonnal a ter-
mékből. Az elemek fokozott kifolyásveszélye
áll fenn!
A behelyezésnél ügyeljen a helyes polarításra!
Tartsa az elemeket a gyerekektől távol, és ne
dobja a tűzbe, ne zárja rövidre és ne szedje
szét az elemeket.
Ha az elemek a termékben kifolytak, a termék
károsodásának az elkerülésére vegye ki azo-
kat azonnal a termékből!
Kerülje el az elemsavnak a bőrrel, szemmel és
nyálkahártyával való érintkezését. Ha az elem-
savhoz hozzáér, mossa le az érintett helyet
bőv vízzel és / vagy forduljon orvoshoz!
Az üzembe helyezés előtt
Az első használat előtt távolítsa el a védőfóliát az
LC-kijelzőről
7
.
Útmutatás: Ez a termék elektromos kerékpáron
nem használható. A motor a termék működési
zavarához vezethet.
Az elem behelyezése
Az elem behelyezésekor
3
az A-ábrán
látható módon járjon el.
Az elemrekesz felnyitásához használjon egy
érmét. Ezzel tekerje az elemrekesz fedelét az
óra járásával ellentétesen.
Ügyeljen az elem helyes behelyezésére (pola-
ritás). Ez fel van tüntetve a termék hátoldalán.
Egy érmével fordítsa el az elemrekesz fedelét
az óra járásával ellentétesen, hogy bezárja
azt.
Eg okostelefonnal olvassa le a
QR-kódot és a videón nézze
meg, hogyan kell összeszerelni
a terméket.
Kerékpár computer
felerősítése
A termék felerősítésekor a B-től I--ig jelzett
ábrák szerint járjon el.
Tudnivaló: Ügyeljen a kábel kifogástalan felerő-
sítésére. Nem szorulhat a résekbe, vagy nem futhat
rajtuk keresztül.
Üzembe helyezés
Alapbeállítások elvégzése
Alapbeállítások: nyelv> felhasználói profil>
kerékméret> hossz-mértékegység> kor>
súly-mértékegység> súly> időrendszer> idő> kar-
bantartási időközök> hőmérséklet-mértékegység
Gomb-funkciók: MODE-gomb a választáshoz /
SET-gomb a jóváhagyáshoz
Tudnivaló: az elem behelyezése után
3
kb.
2 másodperc elteltével
7
az LC-kijelző automati-
kusan bekapcsolódik. Közvetlenül a nyelvválasztás
menübe fog kerülni.
Annyiszor nyomja meg a MODE gombot
11
,
míg meg nem jelenik a kívánt nyelv.
Nyugtázza a választását a SET gomb meg-
nyomásával
12
. Ekkor automatikusan a
felhasználói profil kiválasztó menübe kerül.
Annyiszor nyomja meg a MODE gombot, míg
meg nem jelenik a kívánt felhasználói profil
(megjelenik a
ADVANCE
(haladóknak) vagy
az EASY (egyszerű).
Nyugtázza a választását a SET gomb meg-
nyomásával. A megjelenő menüpontban
kiválaszthatja az abroncsméretet (SET WS).
Az LC-kijelzőben megjelenik egy négyjegyű
szám. Adja meg kerekének az abroncskerületét.
Ehhez annyiszor nyomja meg a MODE gom-
bot, míg meg nem jelenik a kívánt számérték
első számjegye.
Nyugtázza a választását a SET gomb
megnyomásával.
Ismételje meg ezt a műveletet a három
következő számjegyre is.
Tudnivaló: az abroncs kerületét úgy határoz-
hatja meg, hogy az abroncsátmérőt beszo-
rozza 3,1416 értékkel. A listán (M- ábra)
megtalálhatja a leggyakoribb gumi-átmérők
(D) gumi-kerületét (U).
A következő lépésben válassza ki az Ön által
kívánt hossz és sebesség--mértékegységet. Ehhez
annyiszor nyomja meg a MODE gombot, míg
meg nem jelenik az SET KM KMH (km beállí-
tás) vagy az SET MILE MPH (m beállítás) az
LC-kijelzőn.
Nyugtázza a választását a SET gomb megnyo-
másával. Most bekerül az életkor megadásba.
Az LC-kijelzőben megjelenik egy kétjegyű
szám. Adja meg az életkorát. Ehhez annyiszor
nyomja meg a MODE gombot, míg meg nem
jelenik a kívánt számérték első számjegye.
Nyugtázza a választását a SET gomb meg-
nyomásával.
Ismételje meg ezt a műveletet a következő
számjegyre is. Most bekerül a súlymértékegy-
ség kiválasztásba.
Annyiszor nyomja meg a MODE gombot, míg
meg nem jelenik az SET KG (kg beállítás) vagy
az SET LB (font beállítás) az LC-kijelzőben.
Nyugtázza a választását a SET gomb meg-
nyomásával. Most bekerül a súlymegadásba.
Az LC-kijelzőben megjelenik egy háromjegyű
szám. Adja meg a testsúlyát. Ehhez annyiszor
nyomja meg a MODE gombot, míg meg nem
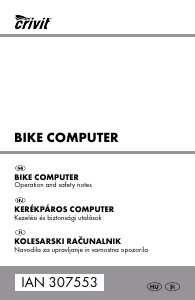
BIKE COMPUTER
BIKE COMPUTER
Operation and Safety Notes
K OLESARSKI RAČUNALNIK
Navodila za upravljanje in varnostna opozorila
L
K
G
2
F
1b
4
E
4
1b
D
1b
2
B
A
6
3
5
I
2
1b
H
2 1b
J
8
9
10
1112
13
14
15
16
17
7
1b
43 2
1a 1c
C
4
1a
1c
M
D U
20
1598 mm
22
1759 mm
24
1916 mm
26
(650 A) 2073 mm
26.5
(Tubular) 2117 mm
26.6
(700 x 25C) 2124 mm
26.8
(700 x 28C) 2136 mm
27
(700 x 32C) 2155 mm
28
(700B) 2237 mm
ATB24
x 1.75 1888 mm
ATB26 x1.4 1995 mm
ATB26 x1.5 2030 mm
ATB26 x1.75 2045 mm
ATB26 x 2 (650B) 2099 mm
27
x 1 2138 mm
27
x 1 1 / 4 2155 mm
IAN 278500
KERÉKPÁR COMPUTER
Kezelési és biztonsági utalások


Csatlakozzon a termékről folytatott párbeszédhez
Itt megoszthatja véleményét a Crivit IAN 278500 Kerékpáros számítógép-ról. Ha kérdése van, először figyelmesen olvassa el a kézikönyvet. Kézikönyv igénylése kapcsolatfelvételi űrlapunk segítségével történhet.
válasz | Hasznos volt (0) (A Google fordította)