
GB GB GB GB GB GB GB GB GB GB GB
GB GB GB GB GB GB GB GB GB GB GB
GB GB GB GB GB GB HU
HU
GB
A kerékpárcomputer
használata
Tudnivaló: Ha 5 percnél hosszabb ideig nem
használja a kerékpárcomputert, úgy az automatiku-
san készenléti üzemmódba lép. Bármelyik gomb
megnyomása, vagy egy rezgés ujraaktiválja a
computert. A funkció-kijelző mutatja az aktuális
módot
Nyomja meg atöbbször a MODE-gombot
13
több-
ször, hogy lapozzon a különböző funkciók között
(lásd a „Funkciók használata“ fejezetet). Nyomja
meg és hagyja lenyomva a SET-gombot
19
, hogy a
tárolt értékeket előhívja, vagy visszaállítsa.
– Scan-kijelzés (a funkciók összekapcsolása egy-
mással)
– automatikus indítás-unkció
– ETA (várható érkezési idő)–távolság
– várható érkezési idő
– üzemanyag-megtakarítás
– hátsó lámpa BE / KI
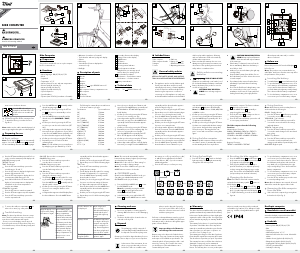
Alkotórészek
1
Mágnes
2
Kábelkötöző
3
Elem
4
Rögzítés
5
Szenzor
6
A kerékpárcomputer rögzítőjének tompítója
7
A kerékpárcomputer elerekeszének fedele
8
Kerékpárcomputer
9
Elsődleges funkciókijelző
10
Funkció kijelző
11
Másodlagos funkciókijelző
Replacing the battery
Note: The bicycle computer battery must be
replaced when the battery state indicator
17
is
shown on the LC display . Press and hold the MODE
button
13
first and hold the SET button
19
at the
same time and keep them pressed until the battery
symbol and {{----}} are shown on the LC display. To
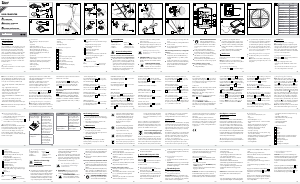
replace the battery, proceed as shown in figure A.
Open the battery compartment by turning the battery
cap anticlockwise towards to the icon using a co
in.
Remove the old battery and replace this with a new
battery. Please note the polarity when inserting the
battery. This is shown in the battery compartment.
Ensure that the O-ring is attached correctly before
inserting the battery. Turn the battery cap clockwise
towards to the icon onto the battery compartme
nt
using a coin to close it. Press and hold any button
to return to normal operating mode.
Note: When the battery has been removed, all i
nfor-
mation will be deleted after approx. 20 seconds.
Initial use
Changing basic settings
Basic settings: Language > Application profile
>Tyre size > Unit of length > Age > Unit of weight
> Weight > Time format > Time > Date format >
Date > CO2 saved >Maintenance interval >Light
ON / OFF > ETA distance > ETA mode > Fuel format
> Fuel cons > Unit of temperature
Important functions
MODE button
13
to configure values / SET button
19
to edit and adopt settings
- Language: 6 language can be select.
- Application profile: ADVANCE or EASY can be
select.
- Tyre size: Enter the circumference for your tyres
sizs in mm, 4 digit number can be input.
HU
van kapcsolva, beállíthatja a BE- és KI-kapcsolás
idejét.
- ETA-távolság: ötjegyű szám bevitele.
- ETA-mód: választás CLOCK (óra) és TIME (utazási
idő) között,
- Üzemanyag formátuma: választás LITER és
GALLON (Gallone) között.
- Üzemanyag-fogyasztás: háromjegyű szám bevi-
tele.
- Hőmérséklet-mértékegység: választás °C és °F
között.
Hagyja jóvá a kiválasztást a SET-gombbal
19
.
Nyomja meg a MODE-gombot
13
a beállítások
lezárásához. Sikeresen elvégezte az alapbeállítá-
sokat.
Ha meg szeretné változtatni az alapbeállításokat,
kérjük, kövesse a „Kerékpárcomputer visszallítása“
fejezetben leírt lépéseket és végezze el újra az
összes alapbeállítást.
Funkciók
– Menü nyelvek: GB, DE, FR, NL, IT, ES
– Óra
– Stopperóra
– Hőmérséklet-kijelzés °C / °F
– Memória funkcióval a min. és max. hőmérsékle-
tekhez
– Utazási sebesség kijelzés (0–99,9 km / h)
– Átlagsebesség kijelzés (0–99,9 km / h)
– Maximális sebesség (0–99,9 km / h)
– Sebesség összehasonlítás
– szokványos sebesség
– Menetidő időzítő (max. 9:59:59) (tolató-, vagy
előre menetben számlál)
– Kilométer számláló (vissza vagy előre számlálással)
– Összkilométer és teljes menetidő kijelzése
– Kalória számláló
– Zsírégetés kijelzés
– CO2-megtakarítás
HUGB
Press the SET button
19
to confirm your entry. Press
the MODE button
13
to proceed to the next function
and repeat the steps as described above.
Press the MODE button
13
to exit settings.
Using the backlight
Press the SET button
19
to temporarily activate the
backlight. The backlight will switch off automatically
after a short amount of time.
Resetting the bicycle computer
Press and hold the SET button
19
first and hold the
MODE button
13
to proceed to setting mode. SET-
TING OPEN or SETTING RESET will be displayed.
Press the MODE button
13
until SETTING RESET
displayed, Confirm reset the product by press the
SET button
19
.
Now you can adjust the previously configured
basic settings (language, age, weight, time). Other
saved information will be deleted.
To open the battery compartment cover, use a
coin to assist you to turn the battery compartment
cover in anti-clockwise direction. Make sure
you fit the battery the right way round (polarity).
This is shown on the back side of the product.
To close the battery compartment cover, use a
coin to assist you to turn the battery compart-
ment cover in clockwise direction.
Attaching the bike computer
To attach the product, proceed as shown in
Figs. B to I.
Note: Make sure the cable is attached prop-
erly. It must not get caught in the spokes or rail
along them.
HU HU HU HU HU HU HU HU HU
HU
Bike Computer
Introduction
We congratulate you on the purchase of your new
product. You have chosen a high quality product.
The instructions for use are part of the product.
They contain important information concerning
safety, use and disposal. Before using the product,
please familiarise yourself with all of the safety
information and instructions for use. Only use the
product as described and for the specified applica-
tions. If you pass the product on to anyone else,
please ensure that you also pass on all the docu-
mentation with it.
Proper use
The product is intended for use as a bike computer.
Not for commercial use.
Functions
– Menu languages: GB, DE, FR, NL, IT, ES
– Clock
– Stopwatch
– Temperature display °C / °F
– Memory function for min. and max. temperature
– Bike speed display (0–99.9 km / h)
– Average speed display (0–99.9 km / h)
– Maximum speed display (0–99.9 km / h)
– Speed comparator
– Speed trend
– Trip timer (max. 9:59:59) (Countdown or for-
wardcounting)
– Odometer (Countdown or forward-counting)
– Total kilometer and total trip time display
– Calorie counter
– Fat burning display
– CO2 saved
– Scan display (functions are interconnected)
– Automatic start function
– ETA (Estimated time of arrival)-Distance
– ETA time
– Fuel Saving
– Back light ON/ OFF
Parts Description
1
Magnet
2
Cable ties
3
Battery
4
Bracket
5
Sensor
6
Damper for bicycle computer bracket
7
Bicycle computer battery cap
8
Bicycle computer
9
Primary functional value display
10
Function indicator
11
Secondary functional value display
12
LC display
13
MODE button (M)
14
Speed comparator display:
Compares the current speed with the average
speed
▲ higher than the average speed
▼ lower than the average speed
15
SCAN display
16
Maintenance interval display
17
Battery state indicator
18
Speed tendency:
This displays the trend in terms of whether the
speed is increasing (large bar, right) or
decreasing (small bar, left).
19
SET button (S)
Technical data
Battery: 3 V (Direct current)
(CR2032 button cell)
Operating temperature: 0–50 °C
Included items
1 Bike computer
1 Bracket with sensor
1 Magnet
6 Cable ties
1 Battery 3 V
(Direct current), type
CR2032 button cell
1 Operating instructions
General safety advice
KEEP ALL THE SAFETY ADVICE AND INSTRUC-
TIONS IN A SAFE PLACE FOR FUTURE REFERENCE!
This product can be used by children aged from
8 years and above and persons with reduced
physical, sensory or mental capabilities or lack
of experience and knowledge if they have been
given supervision or instruction concerning use
of the product in a safe way and understand
the hazards involved. Children shall not play
with the product. Cleaning and user
maintenance shall not be made by children
without supervision.
Please note that the warranty does not cover
damage arising from improper treatment, non-
observance of the operating instructions and
safety advice or unauthorised use.
Safety instructions for
batteries / rechargeable
batteries
DANGER TO LIFE! Keep batteries / recharge-
able batteries out of reach of children. If acci-
dentally swallowed seek immediate medical
attention.
DANGER OF EXPLOSION!
Never recharge non-rechargeable
batteries. Do not short-circuit bat-
teries / rechargeable batteries and / or open
them. Overheating, fire or bursting can be the
result.
Never throw batteries / rechargeable batteries
into fire or water.
Do not exert mechanical loads to batteries /
rechargeable batteries.
Risk of leakage of batteries / rechargeable
batteries
Avoid extreme environmental conditions and
temperatures, which could affect batteries /
rechargeable batteries, e.g. radiators / direct
sunlight.
Avoid contact with the skin, eyes and mucous
membranes. In the event of contact with battery
acid, thoroughly flush the affected area with
plenty of clean water and seek immediate
medical attention.
WEAR PROTECTIVE GLOVES!
Leaked or damaged batteries /
rechargeable batteries can cause
burns on contact with the skin. Wear suitable
protective gloves at all times if such an event
occurs.
In the event of a leakage of batteries /
rechargeable batteries, immediately remove
them from the product to prevent damage.
Only use the same type of batteries / recharge-
able batteries. Do not mix used and new
batteries / rechargeable batteries.
Remove batteries / rechargeable batteries if
the product will not be used for a longer period.
Risk of damage of the product
Only use the specified type of battery /
rechargeable battery!
Insert batteries / rechargeable batteries
according to polarity marks (+) and (-) on the
battery / rechargeable battery and the product.
Clean the contacts on the battery / rechargeable
battery and in the battery compartment before
inserting!
Remove exhausted batteries / rechargeable
batteries from the product immediately.
Before use
Remove the protective foil from the LC display
12
before first use.
Note: This product is not recommended to use
with E-bikes. Interference from the motor may affect
the performance of the product.
Inserting the battery
To insert the battery
3
, proceed as shown in Fig. A.
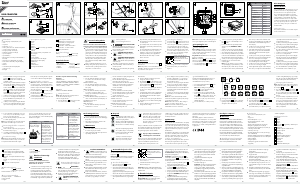
Note: You can calculate your tyre circumference
(U) by multiplying the tyre diameter (D) by 3.1416
(Fig. M). The list (Fig. N) features the tyre circumfer-
ences (U) of conventional tyre diameters (D).
- Unit of length: KM / KMH or MILE / MPH can be
select.
- Age: 2 digit number can be input.
- Unit of weight: KG or LB can be select.
- Weight: 3 digit number can be input.
- Time format: 12 or 24hrs can be select.
- Time: hour and min can be input.
- Date format: DD-MM-YY or MM-DD-YY can be
select.
- Date: Year, month and day can be input.
- CO2 saved: 3 digit number can be input.
- Maintenance interval: 3 digit number can be input.
Note: If the maintenance interval input “000” will
switch off the service indicator.
- Light ON / OFF: Switch ON or OFF the back
light. If selected back light ON, you can input the
back light ON and OFF time.
- ETA distance: 5 digit number can be input.
- ETA mode: CLOCK or TIME for select,
- Fuel format: LITER or GALLON can be select.
- Fuel cons: 3 digit number can be input.
- Unit of temperature: °C or °F can be select.
Confirm your choice using the SET button
19
.Press
the MODE button
13
to exit settings. You have
now successfully configured the basic settings.
If you wish to change the basic settings, please
follow the steps outlined in the chapter „Resetting
the bicycle computer“ and reset all basic settings.
Using the bicycle computer
Note: The bicycle computer will automatically
switch to standby mode when it has not been used
for over 5 minutes. Pressing any button or vibrations
will reactivate the computer. The function indicator
will show the current mode
Press the MODE button
13
repeatedly to scroll
through the different functions(see the chapter on
“Using the functions“). Press and hold the SET
button
19
to request or reset the saved values.
The bicycle computer features the follow-
ing functions:
ADVANCE mode: By pressing the MODE button
13
you can select the following function displays:
CLOCK > TOTALODO > TOTAL-TM > TRIPDIST
>MAXSPEED > AVGSPEED > TRIPTIME > TEMP >
STPWATCH > CAL RATE > CALORIE > FAT-BURN
> CO2 KG >FUELSAVE > ETA > KM+/- > TIME+/-
> SCAN
- CLOCK: Displays the time.
Press and hold the SET button
19
for 3 seconds
and press the SET button
19
again to request the
time and date settings.
TOTALODO: Total mileage counter.
Press and hold the SET button
19
for 3 seconds
and press the SET button
19
again to change the
tyre size, ODO and maintenance interval settings.
TOTAL-TM: Total trip time.
Press and hold the SET button
19
for 3 seconds
and press the SET button
19
again to change the
saved total trip time.
TRIPDIST: Trip distance.
Press and hold the SET button
19
for 3 seconds to
reset the trip distance, maximum speed, average
speed and trip duration to 0.
MAXSPEED: Maximum speed.
Press and hold the SET button
19
for 3 seconds to
set the maximum speed to 0.
AVGSPEED: Average speed.
Press and hold the SET button
19
for 3 seconds to
set the average speed to 0.
TRIPTIME: Trip time.
TEMP: Thermometer.
Press the SET button
19
to display the maximum
temperature value reached (HI). Press the SET button
19
again to display the lowest temperature value
reached (LO). Press the SET button
19
and keep it
pressed while the highest or lowest temperature is
displayed to return to the current temperature and
delete the saved information. Press and hold the
SET button
19
for 3 seconds and press the SET
button
19
again to request temperature unit setting.
STPWATCH: Stopwatch.
Press the SET button
19
to start the stopwatch.
Press the SET button
19
again to stop the stopwatch.
Press and hold the SET button
19
for 3 seconds to
set the stopwatch to 0.
CAL RATE: Current calorie consumption.
CALORIE: Calorie counter.
Press and hold the SET button
19
for 3 seconds to
set the calorie counter to 0.
FAT-BURN: Fat-burning in grams.
Press and hold the SET button
19
for 3 seconds to
set the fat-burning value to 0.
CO2 KG: CO2 saved.
Press and hold the SET button
19
for 3 seconds
and press the SET button
19
again to request the
reference value for CO2 setting.
FUELSAVE: Fuel save comparison with a car.
Press and hold the SET button
19
for 3 seconds
and press the SET button
19
again to request the
fuel unit and fuel consumption setting.
ETA: Expected time arrival.
Press and hold the SET button
19
for 3 seconds
and press the SET button
19
again to request the
ETA distance count down. Press the MODE button
13
and press the SET button
19
again request the
ETA time and ETA countdown timer for selected.
KM +/-: Kilometer counter.
Press and hold the SET button
19
for 3 seconds
and press the SET button
19
again to request the
kilometer counter settings. The LC display will show
the symbol for increasing or decreasing the number
(+ or -) and distance counter value.
TIME +/-: Timer.
Press and hold the SET button
19
for 3 seconds to
change the timer settings. The LC display will show
the symbol for increasing or decreasing the number
(+ or -) and timer counter value.
SCAN: Scan
Note: In scan mode, the display switches automat-
ically between the trip distance, maximum speed,
average speed and trip time.
Note: Refer to the „Basic settings“ chapter to
configure the settings.
Note: To deactivate scan mode press the Mode
button
13
to return to ADVANCE mode.
CUSTOMIZE mode
Alongside ADVANCE and EASY mode, you can
also apply your own settings in CUSTOMIZE mode.
There are two ways of requesting CUSTOMIZE
mode:
a) Press and hold the SET button
19
first and hold
the MODE button
13
to proceed to setting mode.
SETTING OPEN or SETTING RESET will be displayed.
Press the MODE button
13
until SETTING OPEN
displayed. Press the SET button
19
enter the setting
mode. Press the MODE button
13
will display
ADVANCE or EASY.
b) Press the SET button
19
enter to select ADVANCE
or EASY. By repeatedly pressing the MODE button
13
you can switch between the ADVANCE and
EASY modes. EASY mode, press and hold the
SET button
19
to request setting mode. Press the
SET button
19
again. Press the MODE button
13
to activate or deactivate individual settings
(i. e. CLOCK). Select „ON“ to add the selected
function to EASY mode. Select „OFF“ if you do
not wish to add the selected function to EASY
mode.
Removing the bike
computer from the bike
Slide out the bike computer by pressing down
the bracket lock (See Fig. L).
Cut off the protruding tails of the cable ties
2
with a suitable tool such as diagonal pliers.
Troubleshooting
Note: This product has delicate electronic compo-
nents. Therefore interference may occur when it is
near products which transmit radio signals.
- If errors occur in the display, remove any such
products from the vicinity of the product. In the
case of such malfunctions, remove the battery briefly
and then reinsert again.
Problem Solution
Empty LC-display or no
response after putting
the batteries in again
Remove battery. Insert
a sharp object (e.g.
screwdriver) into the
hole marked with “RE-
SET”. Insert a 3 V bat-
tery into the battery
compartment in such a
way that the + terminal
points upwards. Replace
the battery cover on the
battery compartment.
The microprocessor is
reset and restarted.
Speed or distance are
not displayed.
Adjust magnet and
sensor correctly.
- Check that the battery
is inserted with the
poles arranged the
right way round.
Problem Solution
Display is black The ambient tempera-
ture is too high or the
bike computer was ex-
posed to direct sunlight
for too long. Remove
product from direct sun-
light and let it cool off
for a while.
The LC-display shows
irregular symbols.
Remove battery and
replace it again.
Cleaning and care
Do not use any liquids or cleaning agents for
cleaning. Otherwise there is a risk of damaging
the product.
The product should only be cleaned on the
outside with a soft, dry cloth.
Maintenance
Remove the battery when the product will not
be used for longer period of time.
Check regularly the cable and components for
any damage and safe fit.
Disposal
The packaging is made entirely of recyclable
materials, which you may dispose of at local
recycling facilities.
b
a
Observe the marking of the packaging
materials for waste separation, which
are marked with abbreviations (a) and
numbers (b) with following meaning:
1–7: plastics / 20–22: paper and
fibreboard / 80–98: composite
materials.
The product and packaging materials
are recyclable, dispose of it separately
for better waste treatment. The Triman
logo is valid in France only.
Contact your local refuse disposal
authority for more details of how to
dispose of your worn-out product.
To help protect the environment, please
dispose of the product properly when it
has reached the end of its useful life and
Cd = cadmium, Hg = mercury, Pb = lead. That is
why you should dispose of used batteries /
rechargeable batteries at a local collection point.
Warranty
The product has been manufactured to strict quality
guidelines and meticulously examined before deli-
very. In the event of product defects you have legal
rights against the retailer of this product. Your legal
rights are not limited in any way by our warranty
detailed below.
The warranty for this product is 3 years from the date
of purchase. Should this product show any fault in
materials or manufacture within 3 years from the
date of purchase, we will repair or replace it – at
our choice – free of charge to you.
The warranty period begins on the date of purchase.
Please keep the original sales receipt in a safe
location. This document is required as your proof
not in the household waste. Information
on collection points and their opening
hours can be obtained from your local
authority.
Faulty or used batteries / rechargeable batteries
must be recycled in accordance with Directive
2006/66/EC and its amendments. Please return
the batteries / rechargeable batteries and / or the
product to the available collection points.
Environmental damage through
incorrect disposal of the bat-
teries / rechargeable batteries!
Batteries / rechargeable batteries may not be dis-
posed of with the usual domestic waste. They may
contain toxic heavy metals and are subject to haz-
ardous waste treatment rules and regulations. The
chemical symbols for heavy metals are as follows:
of purchase. This warranty becomes void if the pro-
duct has been damaged, or used or maintained
improperly.
The warranty applies to defects in material or
manufacture. This warranty does not cover product
parts subject to normal wear, thus possibly conside-
red consumables (e.g. batteries) or for damage to
fragile parts, e.g. switches, rechargeable batteries
or glass parts.
Kerékpáros computer
Bevezető
Gratulálunk új termékének vásárlása alkalmából.
Ezzel a döntésével vállalatunk értékes terméke
mellett döntött. A használati utasítás ezen termék
része. A biztonságra, a használatára és a meg-
semmisítésre vonatkozó fontos tudnivalókat tartal-
mazza. A termék használata előtt ismerje meg az
összes használati és biztonsági tudnivalót. A termé-
ket csak a leírtak szerint és a megadott felhasználási
területeken alkalmazza. A termék harmadik személy
számára való továbbadása esetén kézbesítse vele
annak a teljes dokumentációját is.
Rendeltetésszerű használat
A terméket kerékpárcomputerként lehet alkalmazni.
Nem ipari alkalmazásra való.
12
LC- kijelző
13
MODE-gomb (M)
14
Sebesség összehasonlítás kijelzés
Összehasonlítja az aktuális sebességet az
átlagsebességgel
▲ magasabb mint az átlagsebesség
▼ alacsonyabb mint az átlagsebesség
15
SCAN-kijelző
16
Karbantartási időköz kijelző
17
Elemállapot-kijelzés
18
Szokványos sebesség
Megmutatja a változást, hogy a sebesség nő
(nagy sugár, jobbra), vagy csökken (kis sugár,
balra)
19
SET-gomb (S)
Műszaki adatok
Elem: 3 V (egyenáram)
(CR2032 típusú gombelem)
Üzemi hőmérséklet: 0–50 °C
A csomag tartalma
1 kerékpárcomputer
1 rögzítő szenzorral
1 mágnes
6 kábelkötöző
1 elem 3 V
-os
(egyenáram),
CR2032-es típusú
gombelem
1 Használati útmutató
Általános biztonsági
utasítások
ŐRIZZE MEG JÓL AZ ÖSSZES BIZTONSÁGI
TUDNIVALÓT ÉS UTASÍTÁST!
A terméket 8 éves kor feletti gyermekek, valamint
korlátozott fizikai, érzékszervi vagy szellemi
képességgel élő vagy nem megfelelő tapaszta-
lattal és tudással rendelkező személyek csak
felügyelet mellett, illetve a termék biztonságos
használatára vonatkozó felvilágosítás és a lehet-
séges veszélyek megértése után használhatják.
Gyermekek nem játszhatnak a termékkel. A
tisztítást és karbantartást gyermekek nem
végezhetik felügyelet nélkül.
Kérjük, tartsa szem előtt, hogy a garancia olyan
károkra nem vonatkozik, amelyek a szakszerűt-
len kezelés, a Használati- és Biztonsági utasítás
figyelmen kívül hagyásának, vagy a jogosulat-
lan használatnak a következményei.
Az elemekre / akkukra
vonatkozó biztonsági
tudnivalók
ÉLETVESZÉLY! Tartsa távol az elemeket /
akkumulátorokat a gyermekektől. Lenyelés
esetén azonnal forduljon orvoshoz!
ROBBANÁSVESZÉLY! Soha ne
töltse a nem feltölthető elemeket.
Az elemeket / akkukat tilos rövidre
zárni és / vagy felnyitni. Annak következménye
túlhevülés, tűzveszély vagy a kihasadásuk lehet.
Soha ne dobja az elemeket / akkukat tűzbe
vagy vízbe.
Ne tegye ki az elemeket / akkukat mechanikai
terhelésnek!
Az elemek / akkuk kifolyásának kockázata
Kerülje a szélsőséges körülményeket és hőmér-
sékleteket, mint pl. fűtőtestek / közvetlen napsu-
gárzás, amelyek hatással lehetnek az elemekre /
akkukra.
Ha az elemek / akkumulátorok kifolytak, kerülje
el bőr, a szemek és a nyálkahártyák vegysze-
rekkel való érintkezését! Azonnal mossa le az
érintett helyet tiszta vízzel és forduljon orvoshoz!
VISELJEN VÉDŐKESZTYŰT! A
kifutott, vagy sérült elemek / akkuk
a bőrrel érintkezve felmarhatják
azt. Ezért ilyen esetben mindenképpen húzzon
megfelelő védőkesztyűt!
Az elem / akku kifolyása esetén távolítsa el azt
azonnal a termékből a sérülések elkerülése
érdekében.
Csak azonos típusú elemeket / akkukat hasz-
náljon! Ne használjon együtt régi és új eleme-
ket / akkukat!
Távolítsa el az elemeket / akkukat, ha hosszabb
ideig nem használja a terméket.
A termék sérülésének veszélye
Kizárólag a megadott típusú elemeket / akku-
kat használja.
Az elemeket / akkut a termék és az elem / akku
(+) és (-) polaritás-jelzésének megfelelően
helyezze be.
Tisztítsa meg az elem / akku és az elemrekesz
érintkezőit a behelyezés előtt!
A lemerült elemeket / akkukat haladéktalanul
távolítsa el a készülékből.
Az üzembe helyezés előtt
Az első használat előtt távolítsa el a védőfóliát az
LC-kijelzőről
12
.
Tudnivaló: Ez a termék elektromos kerékpáron
nem használható. A motor a termék működési
zavarához vezethet.
Az elem behelyezése
Az elem behelyezéséhez
3
az A-ábrán lát-
ható módon járjon el.
Az elemrekesz felnyitásához használjon egy
érmét. Ezzel tekerje az elemrekesz fedelét az
óra járásával ellentétesen. Ügyeljen az elem
helyes behelyezésére (polaritás). Ez fel van
tüntetve a termék hátoldalán.
Fordítsa az elemrekesz fedelét egy érmével az
óramutató járásának megfelelően elemrekeszre,
hogy lezárja azt.
A kerékpárcomputer
rögzítése
A termék felszerelésekor a B-I ábrák szerint
járjon el.
Tudnivaló: Biztosítsa, hogy a vezeték megfe-
lelően legyen rögzítve. Nem szabad a küllőkbe
beakadnia vagy rálógnia.
Üzembehelyezés
Az alapbeállítások
megváltoztatása
Alapbeállítások: Nyelv > Használati profil >
Kerékméret > Hosszmértékegység > Kor > Súlymér-
tékegység > Súly > Időformátum > Idő > Dátumfor-
mátum > Dátum > CO2-megtakarítás >
Karbantartási időköz > Fény BE/ KI > ETA-távolság
> ETA-mód > Üzemanyagformátum > Üzemanyag-
fogyasztás > Hőmérséklet-mértékegység
Fontos funkciók
MODE-gomb
13
az értékek beállításához / SET-
gomb
19
a beállítások módosításáoz és beviteléhez.
- Nyelv: választás 6 nyelvből
- Alkalmazásprofil: választás ADVANCE (haladó)
és EASY (egyszerű).
- Kerékméret: Adja meg a kerék kerületét mm-ben,
négyjegyű szám bevitele.
Tudnivaló: A kerékméretet (U) kiszámíthatja úgy,
ha a kerékátmérőt (D) megszorozza 3,1416-tal
(M-ábra). A lista (N- ábra) tartalmazza a szokványos
kerékméretekhez (U) tartozó kerékátmérőkkel (D).
- Hosszmérték: Választás KM / KMH vagy
MILE / MPH között.
- Kor: kétjegyű szám bevitele.
- Súlymértékegység: Választás KG és LB között.
- Súly: Háromjegyű szám bevitele.
- Idő-formátum: választás 12 és 24 óra között.
- Idő: óra és perc bevitele.
- Dátumformátum: Választás DD-MM-YY
(NN-HH-ÉÉ) vagy MM-DD-YY (HH-NN-ÉÉ) között.
- Dátum: év, hónap és nap bevitele.
- CO2 -megtakarítás: Háromjegyű szám bevitele.
- Karbantartási időközök: Háromjegyű szám
bevitele.
Tudnivaló: Ha a karbantartási időközök „000“
-ra van állítva, akkor a karbantartás kijelzése
kikapcsol.
- Fény ON / OFF (BE / KI): ON (BE-), vagy OFF (KI-)
kapcsolja a háttérvilágítást. Ha a háttérvilágítás be
BIKE COMPUTER
BIKE COMPUTER
Operation and Safety Notes
K OLESARSKI RAČUNALNIK
Navodila za upravljanje in varnostna opozorila
IAN 292844
KERÉKPÁROS COMPUTER
Kezelési és biztonsági utalások
L
K
G
1
F
5
2
E
2
5
D
5
1
B
A
8
3
7
I
1
5
H
1 5
J
9
10
11
13
14
15
16
17
18
19
5
23 1
4 6
C
2
6
D
U
M N
D U
20
1598 mm
22
1759 mm
24
1916 mm
26
(650 A) 2073 mm
26,5
(Tubular) 2117 mm
26,6
(700 x 25C) 2124 mm
26,8
(700 x 28C) 2136 mm
27
(700 x 32C) 2155 mm
28
(700B) 2237 mm
ATB24
x 1,75 1888 mm
ATB26 x1,4 1995 mm
ATB26 x1,5 2030 mm
ATB26 x1,75 2045 mm
ATB26 x 2 (650B) 2099 mm
27
x 1 2138 mm
27
x 1 1 / 4 2155 mm
8
1
5
4
12
8
4


Csatlakozzon a termékről folytatott párbeszédhez
Itt megoszthatja véleményét a Crivit IAN 292844 Kerékpáros számítógép-ról. Ha kérdése van, először figyelmesen olvassa el a kézikönyvet. Kézikönyv igénylése kapcsolatfelvételi űrlapunk segítségével történhet.
válasz | Hasznos volt (0) (A Google fordította)